
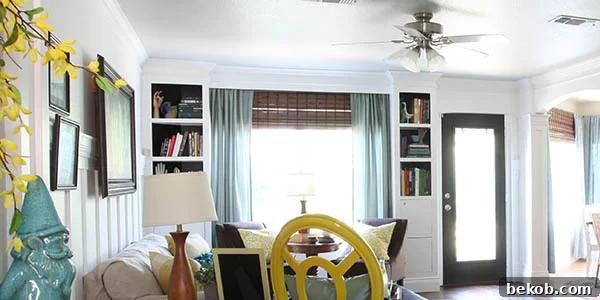
Transforming your living space with custom touches is a rewarding endeavor, and few projects offer as much functional beauty and integrated design as built-in bookshelves. These aren’t just shelves; they are a statement, an extension of your home’s architecture, and a personalized haven for your literary treasures and decorative accents. We recently embarked on such a journey, designing and installing stunning built-in bookshelves in our park house living room. The result was a remarkable upgrade, enhancing both storage and aesthetic appeal, and surprisingly, it was a project well within the capabilities of most DIY enthusiasts. Given the interest and numerous inquiries we’ve received, we’re thrilled to share our comprehensive plans and step-by-step guide to help you create your very own custom built-in shelving unit.
Pin This Built-In Bookshelf Project
Every home, especially older ones, comes with its unique quirks and challenges. Our journey to creating these elegant built-ins was no exception, particularly on the left side of our window. While the plans detailed in this guide are specifically for the bookshelf on the right, which was a straightforward build, the left side presented a classic design dilemma. We discovered a plumbing chase nestled in that corner, an unexpected obstacle that required a slightly custom approach to maintain the desired symmetrical aesthetic. You can delve into the specifics of this particular challenge and its resolution in more detail here. The key was to ingeniously design the built-in around this plumbing chase, effectively hiding it from view while ensuring a seamless and uniform look with its counterpart around the window and doorway. This not only provided invaluable storage but also skillfully concealed an unsightly structural element, proving that even the trickiest corners can become focal points of elegant design. The ability to customize and adapt is truly one of the greatest advantages of DIY projects.
Embarking on a custom built-in bookshelf project begins with meticulous planning. Before you even touch a tool, taking precise measurements of your space is paramount. Visualize how the finished product will integrate with your existing decor and functionality needs. Consider what you’ll be storing – books, decor, or a combination – as this will influence shelf spacing and potential cabinet additions. This thoughtful preparation ensures a smoother construction process and a result that perfectly complements your home. Now, let’s dive into the detailed plans so you can confidently begin building your own bespoke shelving unit.
Below you’ll find the overall dimensions that guided the construction of our built-in bookshelves. These measurements are crucial for understanding the scale and proportion of the unit. Remember, these can be adapted to fit your specific space, but they provide an excellent starting point for visualizing your project.
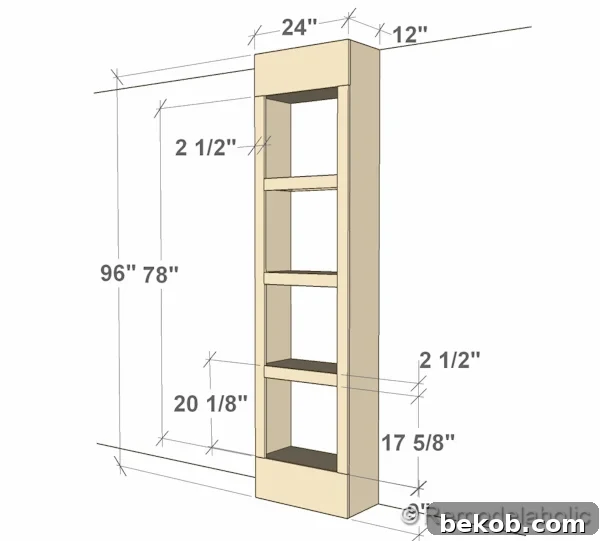
Important Design Notes and Customization Tips
- Adaptability and Sizing: This tutorial provides a solid foundation, but the true beauty of DIY is customization. Feel empowered to modify these plans to perfectly suit the dimensions of your unique space. However, a crucial structural consideration for wider shelves is the need for central support. We highly recommend incorporating a center support system for any shelf exceeding 3.5 feet in width to prevent sagging and ensure long-term durability. This small addition can make a significant difference in the structural integrity and lifespan of your built-ins.
- Molding Integration for a Seamless Look: Our design extends from floor to ceiling, creating a truly integrated, furniture-grade appearance. The gaps at the very top and bottom are intentionally left for the installation of crown molding and base molding, respectively. We personally favor taller baseboards and substantial crown molding, as these architectural details significantly elevate the finished look, making the built-ins appear as if they were always part of the house. When planning your build, carefully measure the height of your chosen base molding once installed, and add this to the width of your chosen face frame. This combined measurement will determine the precise height of your final face frame, ensuring a flush and professional transition between the built-in and your home’s existing trim. Precision in these calculations is key for achieving that coveted seamless, custom aesthetic.
Essential Materials Used for This Project
Selecting the right materials is crucial for the success and longevity of your built-in bookshelves. We opted for MDF due to its cost-effectiveness, smooth surface ideal for painting, and dimensional stability. However, skilled DIYers might also consider high-quality plywood for its strength and resistance to moisture.
- (1) MDF Sheet – 4’x8’x5/8” (Minimum): This single sheet will be the primary material for constructing the majority of your bookshelf components. Depending on your modifications or if you plan to build multiple units, you may need more. MDF provides a smooth finish perfect for painting and is relatively easy to work with.
- (Approximate 100+) Brad Nails 1”: These small, headless nails are ideal for securing components during assembly, especially when combined with wood glue for a strong, lasting bond. Their small size makes them easy to hide with wood filler before painting.
- Wood Glue: While not explicitly listed, wood glue is an indispensable material for any woodworking project. Apply glue to all mating surfaces before fastening with brad nails for superior joint strength and stability.
- Wood Filler/Spackle: Essential for filling nail holes, minor gaps, and imperfections, ensuring a perfectly smooth surface ready for paint.
- Paint and Primer: Choose a high-quality primer and a durable, semi-gloss or satin paint for a professional, easy-to-clean finish that stands up to daily wear and tear.
Recommended Tools for Efficient Construction
Having the right tools not only makes the job easier but also contributes significantly to the accuracy and quality of your finished product. Safety is paramount, so always wear appropriate protective gear, including safety glasses and hearing protection.
- Table Saw (Optional but Recommended): A table saw is invaluable for making long, precise rip cuts from large MDF sheets. If you don’t have one, many home improvement stores offer cutting services, or you can use a circular saw with a guide.
- Miter Saw: Essential for making accurate crosscuts for shelves and face frame components, ensuring clean, square ends for perfect joints.
- Nail Gun (Brad Nailer): Speeds up assembly considerably and creates strong, consistent fastenings. Manual hammering is an alternative but less efficient and can leave more visible marks.
- Sanding Block or Orbital Sander: Crucial for smoothing cut edges, preparing surfaces for primer, and achieving a professional finish. Start with a coarser grit (e.g., 120) and move to a finer one (e.g., 220) for optimal results.
- Tape Measure: The most fundamental tool for accurate measurements. Always double-check your measurements.
- Framing Square: Ensures your cuts and assemblies are perfectly square, which is vital for a structurally sound and aesthetically pleasing unit.
- Pencil: For marking cuts and assembly lines.
- Level (Long and Short): Indispensable for ensuring your shelves are perfectly horizontal and your side panels are plumb, preventing a crooked appearance. A 4-foot level is ideal for checking longer surfaces.
- Stud Finder: Necessary for locating wall studs to securely anchor your built-ins, preventing tipping and ensuring stability.
- Drill/Driver: For pre-drilling holes (to prevent splitting) and driving screws, especially when securing the unit to the wall or adding cabinet hardware.
Precise Cut Sheet (All dimensions are listed as length x width x thickness)
Accuracy in cutting is foundational to a successful built-in project. Use this cut sheet as your guide, but always verify measurements against your specific plans and space before making any cuts. Optimize your cuts from the MDF sheet to minimize waste.
- (5) Wall Brackets – 22 3/4″ x 1″ x 5/8″
- (2) Sides – 96” x 11 3/8” x 5/8’”
- (10) Shelf Brackets – 10 3/4” x 1” x 5/8”
- (1) Top Shelf Support – 22 3/4″ x 11 3/8” x 5/8”
- (1) Bottom Shelf – 22 3/4″ x 11 3/8” x 5/8”
- (3) Middle Shelves – 22 3/4″ x 11 3/8” x 5/8”
- (2) Top & Bottom Face Frames – 24” x 9” x 5/8”
- (2) Side Face Frames – 78” x 2 1/2” x 5/8”
- (3) Shelf Face Frames – 19″ x 2 1/2″ x 5/8”
Step-by-Step Construction Guide for Your Built-in Bookshelves
Follow these detailed steps carefully, taking your time at each stage to ensure accuracy and a professional finish. Remember to use wood glue in conjunction with brad nails for maximum strength.
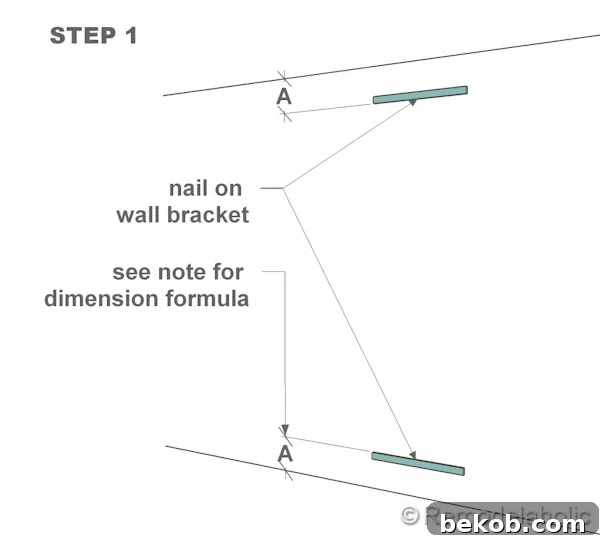
Note: Calculating Dimension “A” for Your Base
Dimension “A” represents the height from the floor to the top of your bottom face frame, accommodating for your base molding. To calculate this critical measurement, you need to precisely add the height of your chosen base molding to the width of your base face frame. For our specific bookshelf, this calculation was: 6 1/2” (for the base molding) + 2 1/2” (for the face frame width) = 9”. This ensures that once your base molding is installed, it will sit flush with the bottom face frame, creating a seamless, integrated look that is crucial for built-ins. Make sure to use your specific molding dimensions for an accurate fit.
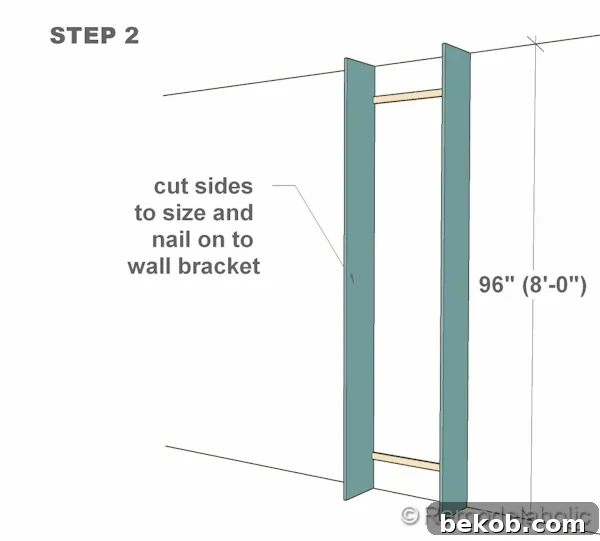
Step 2: Attaching the Side Panels to the Wall Brackets. With your wall brackets securely installed and leveled, it’s time to attach the first side panel. Apply a continuous bead of wood glue along the edge of the wall bracket where the side panel will meet. Carefully position one of the 96″ x 11 3/8″ x 5/8″ side panels against the wall bracket and fasten it with 1″ brad nails, spacing them approximately every 6-8 inches. Ensure the side panel is plumb using your level before securing it. This connection forms the fundamental structure of your bookshelf, so precision here is key.
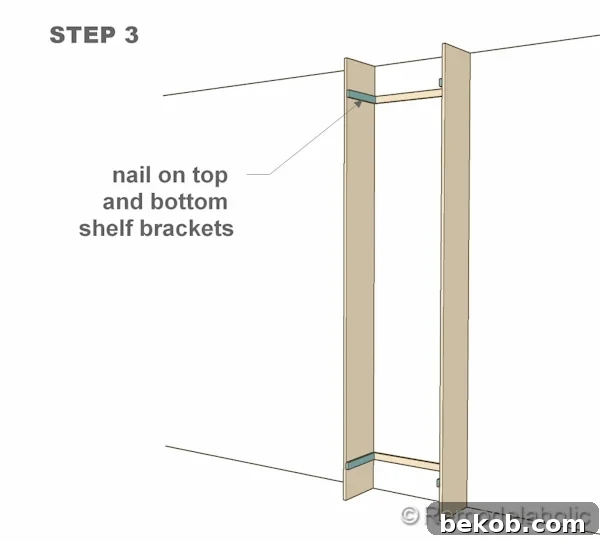
Step 3: Installing the Bottom Shelf. Now, carefully position the 22 3/4” x 11 3/8” x 5/8” bottom shelf. Apply wood glue to the ends of the bottom shelf where it will meet the side panels, and also along the top edge of your base support (if applicable). Slide the bottom shelf into place, ensuring it is perfectly level and square with the side panel you just installed. Secure it through the side panel into the shelf ends with 1″ brad nails. For additional strength and to prevent any potential sag, you can also nail down through the shelf into any underlying support structure. This shelf provides the foundational surface for the rest of your unit.
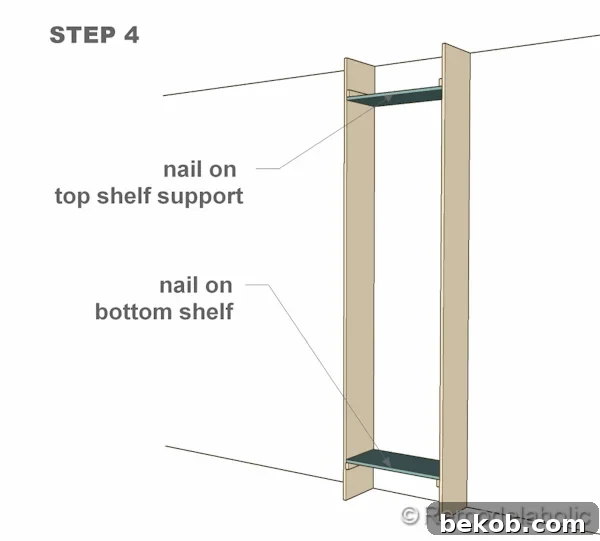
Step 4: Securing the Top Shelf Support. Next, take your 22 3/4” x 11 3/8” x 5/8” top shelf support. This piece will define the top boundary of your main shelving area. Apply wood glue to the ends and position it carefully at the very top of your side panels, ensuring it is flush with the front and back edges. Use your level to confirm it is perfectly horizontal before securing it with 1″ brad nails through the side panels into the ends of the support. This top support also provides a solid anchor point for future crown molding installation, contributing to the integrated look.
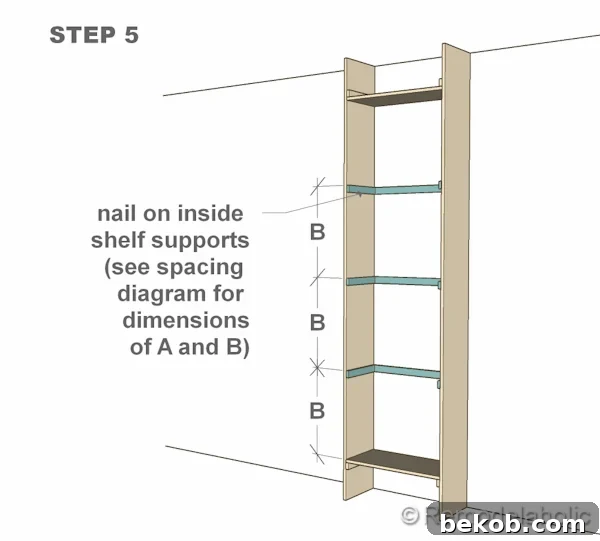
Note: Calculating Dimension “B” for Even Shelf Spacing
Dimension “B” determines the consistent vertical spacing of your shelves, ensuring a harmonious and functional design. To calculate “B,” first, measure the total clear opening height from the top of your bottom shelf to the underside of the top shelf support. Referring to our initial dimension diagram, this measurement is 78”. Next, account for the combined thickness of your shelf face frames within this opening. Since we have three shelf face frames, and each is 2 1/2” wide, their total width is (3 x 2 1/2”) = 7 1/2”. Subtract this combined face frame width from your total opening height: 78” – 7 1/2” = 70 1/2”. Now, divide this remaining height by the number of shelf openings you desire. For our design, we have 4 shelf openings, so 70 1/2” / 4 = 17 5/8”. Finally, subtract the actual thickness of one of your shelves (which is 5/8”) from this value to get the clear vertical opening height for each shelf: 17 5/8” – 5/8” = 17”. Therefore, the dimension of B, which is your clear vertical shelf opening height, is 17”. This detailed calculation guarantees perfectly even shelf spacing.
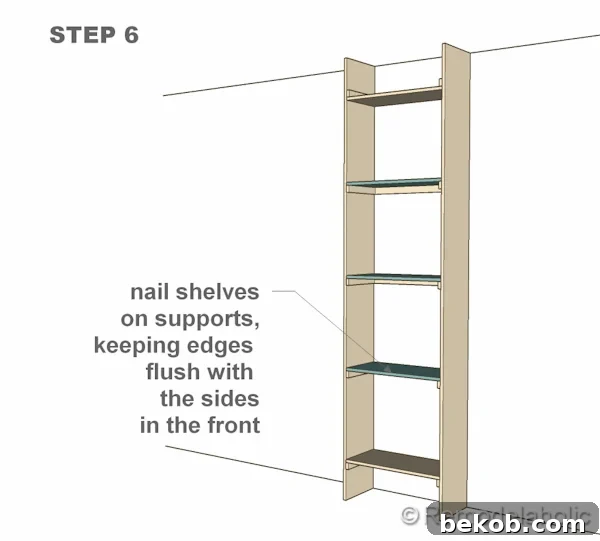
Step 6: Installing the Middle Shelves and Shelf Brackets. Based on your calculated Dimension “B,” precisely mark the positions for your middle shelves along the interior of both side panels. For each middle shelf, you will first install two 10 3/4” x 1” x 5/8” shelf brackets on the back wall, ensuring they are perfectly level across the span of the bookshelf. Apply wood glue to the back of these brackets and secure them to the wall studs with screws or strong wall anchors for maximum support. Once the brackets are in place, apply wood glue to their top edges and to the ends of the 22 3/4” x 11 3/8” x 5/8” middle shelves. Carefully slide each shelf into position, resting it on the brackets, and then secure it by nailing through the side panels into the ends of the shelf. Repeat this process for all three middle shelves, double-checking for level and squareness at each installation.
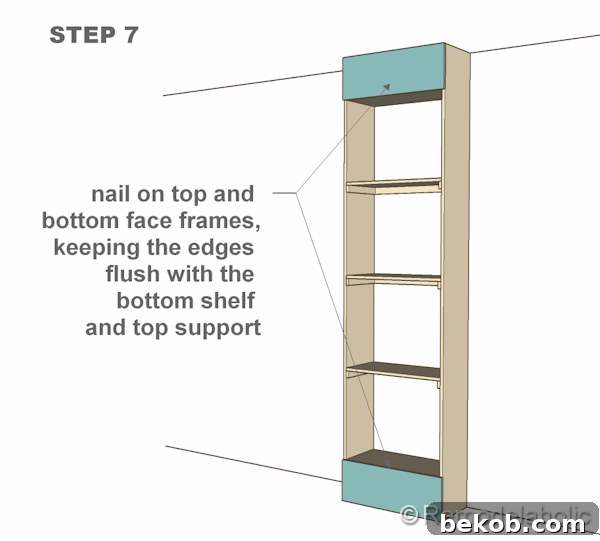
Step 7: Attaching the Side Face Frames. With all your shelves in place, it’s time to add the face frames, which give the built-in its finished, substantial appearance. Take your two 78” x 2 1/2” x 5/8” side face frames. Apply wood glue along the front edges of the side panels, making sure to spread it evenly. Carefully align the side face frames with the exterior edges of the side panels. Ensure they are perfectly plumb and flush with the front of the shelves. Secure them with 1” brad nails, spacing them consistently every 8-10 inches. The face frames not only enhance aesthetics but also add rigidity to the entire structure, giving it a solid, furniture-quality feel.
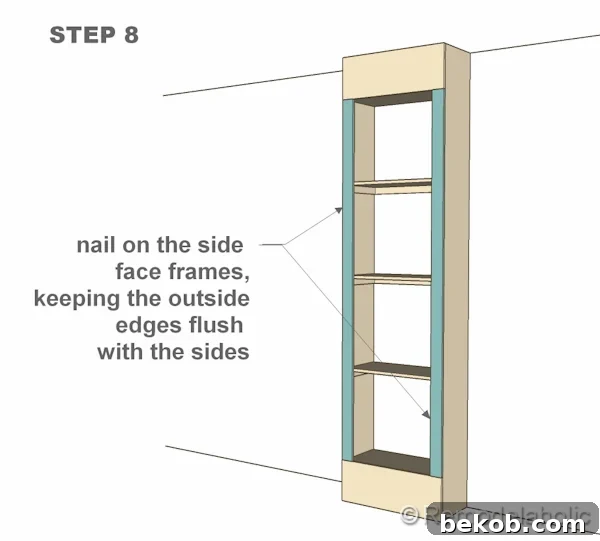
Step 8: Installing the Top and Bottom Face Frames. Next, attach the two 24” x 9” x 5/8” top and bottom face frames. Apply wood glue to the mating surfaces, including the top edge of the bottom shelf face and the bottom edge of the top shelf support. Position the bottom face frame directly above your base molding allowance (Dimension A), and the top face frame flush with the top shelf support. Ensure these pieces are perfectly level and extend to the outer edges of the side face frames, creating a continuous, framed look. Secure them in place using 1” brad nails, making sure to nail into the underlying shelf or support structure. These frames further define the main opening and provide a clean transition for future molding.
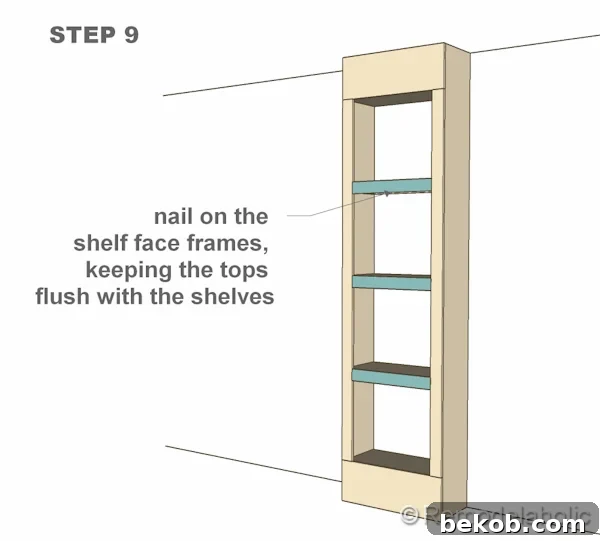
Step 9: Adding the Shelf Face Frames. This step completes the framing of your shelving unit. Take your three 19″ x 2 1/2″ x 5/8” shelf face frames. Apply wood glue along the front edges of each middle shelf. Carefully align each shelf face frame with the front edge of its corresponding middle shelf. Ensure these frames are perfectly level and centered between the side face frames, creating consistent openings for your books and decor. Secure each shelf face frame with 1” brad nails, driving them through the face frame into the front edge of the shelf. This final layer of framing significantly enhances the structural integrity and provides a professional, built-in appearance that conceals the raw edges of the shelves. Take your time to align each piece meticulously for the best visual outcome.
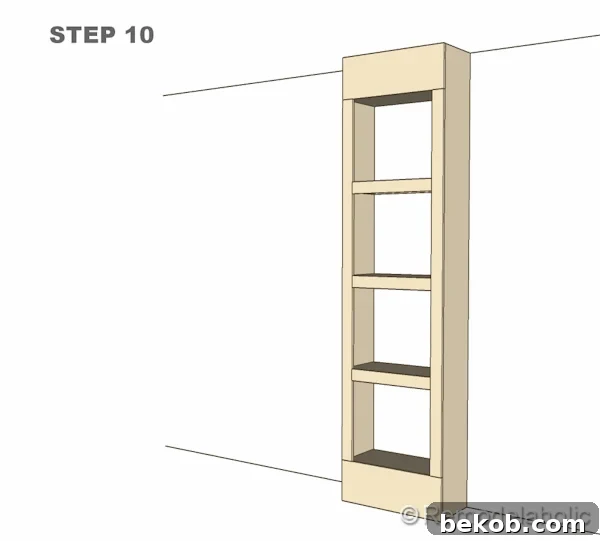
Step 10: Securing the Entire Unit to the Wall. The final and crucial step for safety and stability is to securely anchor your built-in bookshelf to the wall studs. Even though the unit might feel sturdy, anchoring prevents tipping, especially important in homes with children or pets. Using a stud finder, locate the wall studs behind your bookshelf. Pre-drill pilot holes through the back of your bookshelf (ideally through the thicker parts like side panels or top support) into the studs. Then, drive long screws (e.g., 2.5-3 inches) through these pilot holes and into the wall studs, sinking the screw heads slightly below the surface. You can later cover these with wood filler. This step ensures your beautiful new built-in is permanently and safely integrated into your home’s structure.
Congratulations! You’ve successfully completed the construction phase of your custom built-in bookshelves. This significant accomplishment is the result of careful planning and precise execution. Now, it’s time to bring your creation to life with a professional finish. The next crucial steps involve thorough sanding, filling any imperfections, and applying a high-quality paint finish. These stages are just as important as the construction itself, as they will define the overall look and feel of your new built-ins, ensuring they look truly integrated and custom-made for your home.
After living with our newly constructed built-ins for a short period, we realized an additional enhancement would greatly benefit both functionality and aesthetics: adding doors to the bottom two shelves. This decision stemmed from a desire to conceal clutter, provide a child-safe storage solution for small hands, and contribute to a more finished, cabinetry-like appearance. The process was surprisingly straightforward. We simply cut two door panels from a sheet of MDF, sizing each panel to be 1/8” less wide on all sides than the respective shelf opening. This slight allowance ensures a smooth operation and prevents rubbing. We then attached two small hinges to each door, carefully aligning them for seamless opening and closing, and voilà! The addition of these flush-mounted doors instantly elevated the sophistication of the built-ins, offering both practical storage and a sleek, integrated look.
Now that you’re equipped with these detailed plans and instructions, it’s your turn to embark on this rewarding DIY journey and build your own custom built-in bookshelves. Imagine the satisfaction of crafting a functional and beautiful piece that perfectly suits your home and reflects your personal style. Built-ins not only provide exceptional storage and display opportunities but also significantly enhance your home’s value and aesthetic appeal. Don’t stop here; explore our other free project plans to discover more inspiring ideas and tackle additional home improvement projects that will transform your living spaces.