
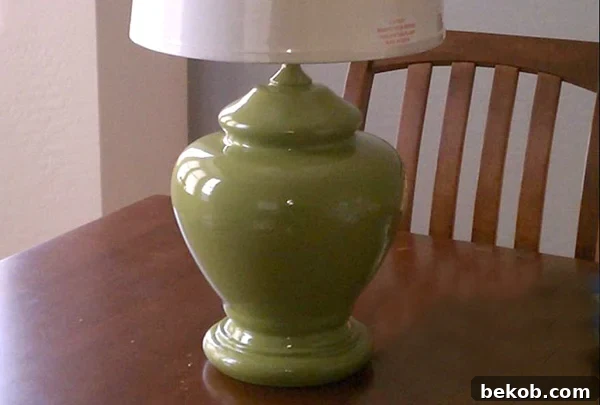
Learning From Mistakes: An Epic DIY Lamp Makeover Journey
Submitted By A Happy Place Called Home
While some find solace and relaxation in a professional nail salon, my sanctuary for stress relief has always been the world of craft projects. There’s an unparalleled satisfaction in transforming something old into something new, and sometimes, the most challenging projects yield the most valuable lessons. My recent lamp makeover adventure began with a thrift store haul and quickly evolved into a testament to perseverance, patience, and the undeniable truth that sometimes, you truly do get what you pay for in the realm of DIY. This isn’t just a story about painting lamps; it’s a journey through common DIY pitfalls and how to navigate them to achieve a truly rewarding outcome for your home decor.
The Thrill of the Thrift Store Find: A Diamond in the Rough
Just last weekend, I shared the excitement of my thrifty shopping spree at a wonderful local store called Savers. What I neglected to mention, however, was the incredible speed with which I dove into my very first project upon returning home. Within mere minutes of walking through my front door, my hands were already itching to begin. Among my fantastic finds, two items, in particular, ignited my DIY spirit: a pair of lamps, each priced at an unbelievable $4.99. The original color wasn’t quite my style, and the existing gold trim coupled with an ornate bird design definitely didn’t align with my aesthetic preferences. They were, to put it mildly, not my “cup of tea.”
“Why purchase lamps that aren’t perfect?” you might wonder. The answer is simple: their fundamental shape was absolutely ideal, and the price point was, without a doubt, a steal! I instantly recognized their potential, envisioning a complete transformation that would give them a new lease on life. More than just a functional update, refinishing them promised a fulfilling weekend project, allowing me to inject my personal style into my living space without breaking the bank. This vision became the driving force behind the entire endeavor, a clear goal for my budget-friendly home decor aspirations.
Prepping for Perfection: Essential First Steps
The journey to a successful lamp makeover begins long before the first spray of paint. Proper preparation is paramount for achieving a smooth, durable, and professional finish. My initial step involved meticulously taping off all electrical components on each lamp, including the power cord. This crucial measure protects sensitive parts from paint and ensures the lamps remain safe and functional post-makeover. Don’t skip this step – a little patience here saves a lot of trouble later.
Next, I set up my dedicated spray painting station in the center of my garage. While outdoor painting might seem convenient, several factors made the garage a superior choice. A strong breeze outside would have made even, consistent coverage nearly impossible, leading to overspray and wasted paint. Furthermore, living in a particularly dusty area meant that painting outdoors risked embedding unsightly dust bunnies into the fresh paint, ruining the finish. The garage provided a controlled environment, shielding my project from the elements and ensuring a cleaner, more professional result. Proper ventilation is still critical indoors, so ensure you have adequate airflow if you choose this route, or wear a respirator.
The Primer Protocol: Laying the Foundation for Color
Before applying any color, I carefully cleaned each lamp with a damp cloth to remove any lingering dust, grime, or fingerprints. A clean surface is essential for proper paint adhesion. Once thoroughly dry, I proceeded to apply a high-quality primer. Primer serves several vital functions: it provides an ideal base for the topcoat, improves paint adhesion, and, crucially, helps to conceal the original color and any intricate designs underneath. For these lamps, covering the gold trim and those persistent bird motifs was a key objective, and the primer delivered. I managed to achieve excellent coverage with two coats of primer on each lamp base, using only about one and a half cans. I was genuinely surprised by how effectively the primer obscured the original design within minutes, leaving a perfectly smooth and uniform surface ready for color.
The Costly Mistake: When Budget Paint Fails
With the primer perfectly dry, my spirits were high. I began applying the Krylon Avocado green spray paint to the first lamp base, anticipating a similarly smooth application. “Wow, this project is going extremely well!” I thought to myself. Oh, how quickly those thoughts turned to a frustrated, “What in the world is happening?!”
The primer had gone on like a dream: smooth, full-coverage, and with a clean finish. Naturally, I expected the same performance from my avocado topcoat. Unfortunately, this was where I learned a valuable, albeit frustrating, lesson: “In the world of spray paint, you get what you pay for.” Krylon, being about a dollar cheaper than Rust-Oleum, seemed like a smart, thrifty choice at the time. I thought I was brilliantly showcasing my budget-savvy skills! Instead, my attempt to save a few greens left me with a paint product that simply would not spray evenly. While the primer achieved perfect coverage at about 18 inches, the Krylon paint sputtered out in large blotches from that distance. Moving closer to smooth out the blotches resulted in excessive paint buildup, leading to the unsightly drips and bubbles you see in the photos. To add insult to injury, most of the Krylon paint ended up dripping down the nozzle and all over my hands. It felt like more paint coated me than the actual lamps!
A Fortuitous Find: The Right Paint Makes All the Difference
Disheartened but not defeated, I hurried back to the store, specifically searching for a Rust-Oleum green paint that would rectify this disaster. Serendipitously, I discovered exactly what I needed:
Finding this particular shade of green instantly lifted my spirits. I felt that this color was a far better fit for the project’s overall vision anyway. It was as if the cosmic forces of DIY were aligning, signaling that something genuinely great was about to emerge from this painting mishap. With my new, superior paint in hand, and a package of face masks (a highly recommended investment to protect your lungs from paint fumes!), I confidently returned to the garage, ready for round two. This time, I was armed with better supplies and, more importantly, a newfound wisdom about paint quality.
The School of Hard Knocks: A Lesson in Patience
The lessons from the school of hard knocks can be brutally effective, can’t they? My mother always tried to instill the value of patience in me, but clearly, some lessons require personal experience. Fresh from the store, new paint poised for action, I impulsively decided to re-coat the avocado-green mess on the first lamp with primer. The previous coat was only semi-dry at this point, and if you’re not familiar with the consequences of applying wet paint over semi-dry paint, allow me to illustrate:
Indeed, folks, that is precisely what semi-dry paint looks like when it cracks and peels under the weight of a newly applied wet coat. And yes, that rhythmic thumping sound you might be imagining is the echo of my head repeatedly hitting the table as I chanted, “Stupid, stupid me!” It was a moment of sheer frustration, a stark reminder that rushing a DIY project often leads to more work and greater disappointment. This became my personal spray paint Cinderella story, starting with disheartening setbacks but ultimately promising a fairytale ending.
Redemption: The Second Lamp and Meticulous Sanding
Driven by my eagerness to see what the new green paint truly looked like, I moved the disaster-prone lamp number one aside and brought lamp number two onto the table. This second lamp, thankfully still in its perfectly primed state, treated me much better. With the Rust-Oleum paint, the application was smooth, even, and consistent – a stark contrast to my previous experience. The only minor challenges encountered during this phase were the tiny pollen poufs that began to drift into my garage in the late afternoon. I had to carefully pick a few out of the wet paint, but these were negligible compared to the prior issues.
Once the first lamp had *completely dried* (and I mean completely – I wouldn’t make that mistake again!), I dedicated several hours to hand-sanding the dried, cracked paint. My goal was to achieve the smoothest possible surface, patiently working away the imperfections until it felt significantly better. While the finish wasn’t absolutely flawless up close, revealing some subtle “scars,” I believe these minor imperfections add character and a unique story to the piece. Perhaps that’s just my justification after all that sanding! Nonetheless, the improvement was dramatic and deeply satisfying.
The Grand Reveal: Transformed Lighting for a Happy Home
Stepping back to admire the finished lamps, especially after adding a pair of inexpensive yet stylish $15 lamp shades from Walmart, the transformation was remarkable. Even the “crazy-drama-queen-lamp” (as I affectionately named the first one) looked pretty fantastic!
There’s still one minor detail I plan to address: the lamp shades are currently supported by lamp harps borrowed from lamps in my master bedroom. These harps are a bit too tall, causing the shades to sit a bit high. My next step will be to order some shorter harps to lower the shades by about an inch, perfecting the silhouette. Other than that, I am absolutely in love with my new, revitalized lamps! Now, if only I had the perfect dressing table to showcase them on. Oh, well, someday!
Cost Breakdown & Lessons Learned for Your DIY Success
Here’s a transparent breakdown of the costs involved in this project, including the expenses incurred from my learning curve:
- 2 lamp bases: $4.99 each ($9.98 total)
- 2 lamp shades: $14.99 each ($29.98 total)
- 3 cans Rust-Oleum Primer: $4.68 each ($14.04 total)
- 4 cans Krylon Avocado paint: $3.24 each ($12.96 total – the blooper expense!)
- 4 cans Rust-Oleum “fix the Krylon” paint: $4.28 each ($17.12 total)
- Set of 3 painter’s masks: $4.98
- Other materials: tarp/drop-cloth, gloves, lamp harps, sandpaper – already had on hand.
Considering my painting misadventures, you could complete a similar DIY lamp makeover project for significantly less. By learning from my mistakes, you can avoid the “blooper” costs! For a smoother project, you’ll typically need 2-3 cans of quality primer and 3-4 cans of your chosen finish color (I always recommend an extra can, just in case, as it can always be used for future projects). This project truly reinforced the importance of choosing quality materials, exercising patience, and being prepared for unexpected challenges. Embrace the journey, and you’ll not only create beautiful home decor but also gain invaluable DIY experience.
Explore More Bright Ideas for Your Lamps!
- Hand Painted Lamp Shade Tutorial
- Turning a Glass Vase Into a Lamp Tutorial
- How to Build a Tripod Lamp from a Music Stand
- DIY Dish Lamp Tutorial
- Revamping Your Lamps, and Lampshade Ideas