
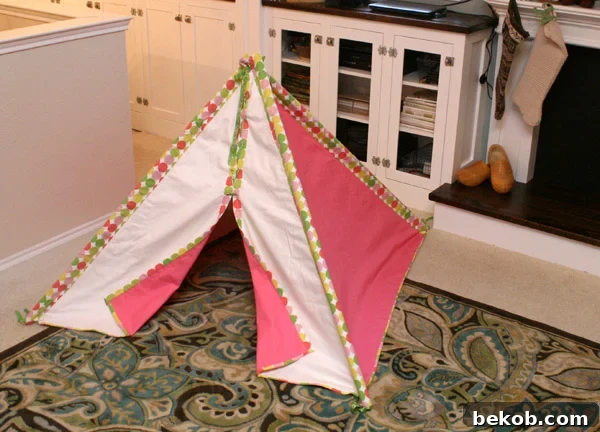
Welcome to a journey of creating a cherished childhood memory! Last Christmas, I embarked on a delightful project, crafting a little play tent for my daughter, Etta. Looking back at photos, it’s truly incredible how quickly they grow, and how much joy simple, handmade creations can bring. This post is a comprehensive guide to building your very own beautiful, durable, and washable DIY kids’ play tent. Prepare for a detailed tutorial that will empower you to create a magical space for the little ones in your life.
The initial spark for this project came from a charming tent I discovered and saved from Better Homes & Gardens:
I apologize for the vintage quality of that inspiration image; it’s been a treasured clipping for quite some time! While I wanted to share this DIY play tent tutorial last year, my initial attempt was a bit improvisational, making it challenging to document clearly. I envisioned refining the process, but time constraints meant I couldn’t test and perfect a pattern until recently.
Fortunately, my wonderful babysitter, Catelin, who has a daughter Etta’s exact age, expressed interest in making one for her little girl. This provided the perfect opportunity to revisit and streamline the entire process. Working together, we completed the tent smoothly, requiring about six hours of focused, child-free time. The result is a much-improved and clearer homemade play tent pattern that I’m thrilled to share with all of you.
I want to be transparent: this pattern, while greatly enhanced, may still have minor areas for improvement. I welcome your feedback and suggestions to clarify any steps. Your input will help make this an even better resource for the DIY community. Please note, if you recreate this project, I kindly ask that you link back to this specific post on your blog rather than re-publishing the pattern directly. Your support helps keep these free tutorials coming!
Why a DIY Play Tent? More Than Just a Toy!
A homemade play tent is far more than just another toy; it’s a cornerstone for imaginative play and a cozy sanctuary for any child. Building a DIY kids’ tent offers numerous benefits. Firstly, it fosters creativity, providing a blank canvas for adventures, from daring jungle expeditions to quiet reading nooks. Secondly, it’s a budget-friendly alternative to store-bought options, allowing you to select durable, high-quality fabrics that reflect your child’s personality and your home decor. Furthermore, a fabric tent offers a unique, personalized touch that mass-produced items simply can’t match. It’s also easily washable, ensuring a clean and hygienic play environment. Most importantly, the process of creating a special space like this builds lasting memories, making the tent a treasured part of childhood for years to come.
Gathering Your Essentials: Supplies List for Your Play Tent Project
Fabric & Notions:
- Accent Fabric: 2 yards. This will be used for the pole pockets, door binding, and bottom trim, adding a lovely contrasting or coordinating detail.
- Tent Wall Fabric: 4 ½ yards. For the main body of the tent. A width of 45 inches is ideal, but 60-inch wide fabric will also work perfectly. Choose a durable, washable fabric like canvas, duck cloth, or a heavy-duty cotton blend that can withstand enthusiastic play and frequent washing.
- Optional Lining Fabric: Another 4 ½ yards of accent or plain fabric. Adding a lining can give the tent extra body, a more finished look, and enhanced durability.
- Matching Thread: Essential for a neat finish.
- Grommets: Approximately 20 3/8-inch grommets. These add a functional and decorative touch to the door opening. Ensure your grommet kit includes a setting tool, or purchase one separately.
- Coordinating Ribbon: 3-4 yards. For tying the tent door panels and securing the poles.
Structure & Hardware:
- White PVC Pipes: Two 10-foot lengths (3/4-inch diameter). PVC is an excellent choice for its lightweight, durable, and cost-effective nature, providing a sturdy yet portable frame for your indoor play tent. Catelin used 1-inch conduit, which also works, but I personally prefer the slightly slimmer 3/4-inch PVC for a more elegant look and feel.
A Quick Tip: It is highly recommended to prewash all your fabric before you begin cutting and sewing. This crucial step prevents any unwanted shrinkage after the tent is completed and washed in the future, ensuring your finished play tent maintains its size and shape.
Step-by-Step Guide: Building Your Dream Play Tent
Step 1: Precision Fabric Cutting – The Foundation
Begin by carefully cutting your tent wall fabric. You will need three equal pieces, each 1 ½ yards long. Take each 1 ½ yard piece, fold it in half lengthwise, and then cut diagonally from one corner to the opposite folded edge. This technique creates one large triangle (the main tent panel) and two smaller triangles. Repeat this process for all three pieces of tent wall fabric. If you’ve opted for a lining, repeat these steps with your lining fabric as well.
For accuracy, we used a straight edge to mark our cut lines with a pencil, ensuring clean, precise cuts for each tent panel.
Next, move on to cutting your coordinating accent fabric according to these specifications:
- Pole Strips: Four strips, each 6 inches wide and the full length of your fabric. These will form the durable pockets for your PVC poles.
- Door Opening Strips: Two strips, each 3 inches wide. These will create a neat, finished edge for the tent’s doorway.
- Bottom Edge Banding: Three to four strips, each 1 ½ inches wide. These will be joined to create a continuous trim for the bottom circumference of the tent.
Step 2: Assembling the Tent Walls – Bringing Your Vision to Life
It’s time to start sewing! First, take your three large triangular tent wall pieces. Make a small, straight cut across the very top point of each triangle – no more than 1 inch. I initially cut off too much, which I had to correct later, so learn from my mistake! This small cut is essential to reduce bulk when all layers come together for the pole pockets, preventing you from having to sew through too many layers of fabric.
Next, hem this small raw edge by folding it over twice, about ¼ of an inch each time, then sewing a secure straight line along the fold. This finishes the top edge of each panel cleanly.
To enhance durability where the poles will exert the most stress, I decided to reinforce the tops of the pole pockets. Instead of doubling the entire pocket (which would waste fabric), simply fold over the accent fabric intended for the pole pockets by about 13 inches from the top. This provides a stronger, thicker section at the stress point.
With the “good” (right) sides of your tent wall panel and pole pocket fabric facing each other, align the raw edges. Ensure the pole pocket fabric overlaps the top of the tent panel by about 1 inch. Sew down the side, creating the first seam that will eventually form part of the pole pocket. Repeat this for all three main tent panels, attaching a pole pocket strip to each side.
Continue this process, adding the next triangular tent panel to the assembly, ensuring right sides are together and all edges align.
Once all three panels are sewn together, your tent fabric will begin to resemble this shape, a wide, gently curving structure ready to stand tall:
Step 3: Finishing the Base – Trimming and Binding the Bottom Edge
With all the main tent pieces joined, it’s time to create a neat, even bottom edge. Lay your tent fabric flat and carefully trim the entire bottom edge so it is perfectly even and smooth. This step is crucial for a professional-looking finish. (Don’t mind the laundry on the couch in the background – sometimes creativity takes precedence over tidiness when you’re making a tent!)
Next, prepare your bottom edging strips. Join them together by laying them at a right angle and sewing diagonally across the corners. This method creates a less bulky seam compared to a straight join. While cutting on the bias would offer more stretch, it’s not necessary for this project and would be more time-consuming. You can match patterns if desired, but it’s purely aesthetic.
Lay your tent fabric right side up, then place the joined trim strip on top, right side down, aligning the raw edges along the bottom circumference. Pin thoroughly to secure, then sew along this edge.
Once this initial seam is sewn, fold the binding over to the back, tuck in the raw edge, and then fold it over one more time to the front, creating a clean, finished edge. Secure this final fold with pins and sew a neat straight line to bind it in place. The images below illustrate this folding and sewing process clearly!
Step 4: Crafting the Doorway – Adding Central Binding
Once the bottom binding is securely in place, it’s time to define the tent’s entrance. Take one of your 3-inch wide door opening strips. Begin by placing the “good” (right) side of the binding strip against the “back” (wrong) side of one of the door panels, overlapping the end by at least ½ inch. Sew along this edge to attach the binding. Repeat for the other door panel.
Now, flip the edging piece over. Fold the raw end down to the back side, as shown in the images below, creating a neat fold.
Then, fold the binding over again, this time to the front of the door panel, completely encasing the raw edge within the fold.
Secure this folded edge with pins and sew a straight line approximately 1/8th of an inch in from the edge to hold it firmly. Repeat for the other door panel.
This is a glimpse behind the scenes when I’m engrossed in projects like this – a functional sewing space, perfectly messy!
For an added touch and a more polished appearance, I decided to sew another small seam about 1/8th inch in, running parallel to the first seam down the center line of the door binding. This creates a subtle yet impactful decorative detail, as seen in the second image below.
Step 5: Pre-empting Future Steps – Adding Ribbon Ties (Critical Timing!)
Here’s a crucial lesson learned from my first tent: I initially sewed the ribbon ties to the bottom of the pole pockets by hand *after* the poles were enclosed. This was a fiddly and unnecessary hassle. Please, add two ribbons to the bottom of each pole pocket *right now* before you proceed to close up the pole pockets in the next step! This will save you time and effort. You can find visual examples of the finished ribbon ties in Step 9, but install them proactively here.
Step 6: Securing the Pole Pockets – Durability at the Top
Let’s turn our attention to the top of the pole pockets. At this stage, they should look like this, with the initial seam attached:
Fold the “good” sides of the pole pocket fabric together at the top. Sew across the top edge several times to create a very strong seam; this area will experience significant stress from the poles. Then, sew down the side of the pocket, stopping at the point where it meets the main tent panel. Your seam will effectively form an “L” shape. This creates a secure, enclosed channel for your PVC poles.
Once sewn, flip the finished pocket right side out. It should now appear neat and enclosed, like the image below.
To ensure all raw edges are neatly hidden on the inside of the tent, carefully tuck the seam allowance into the pole pocket channel. Pin it firmly in place to prepare for stitching.
Once the seams are neatly tucked and pinned, sew along the outside of the tent wall, just inside the edge of the pole pocket. This stitch will ensure the raw edges remain hidden and reinforce the channel. After this, sew another seam approximately ¼ to ½ inch away from the first seam, creating a robust and clean finish for your pole pockets.
Step 7: Refining the Structure – Pinning and Securing the Top
During assembly, I encountered a slight issue: the gaps between the poles at the very top were a bit too wide, causing the tent to be less stable. This could likely be avoided by cutting less fabric off the very tippy-top of the original triangles in Step 1. However, to fix it, I simply gathered the excess fabric between the pole pockets on the inside of the tent, pinched it together, and secured it with a quick, small loop stitch. This pulls the tops of the poles closer, significantly improving the overall stability and structure of the tent.
Step 8: Decorative Touches – Installing Grommets
To add both functionality and a charming aesthetic, I installed grommets along the front door openings. These allow you to tie the door panels together, creating a cozy and secure entrance. I opted for 1/4-inch grommets, which provide a delicate yet sturdy detail. While the BHG version featured a solid piece with a sewn-shut lining, I truly prefer the dynamic look and customizable feel of ribbons and grommets for our homemade play tent.
Step 9: Final Touches – Securing the Ribbon Ties (Revisited)
As mentioned in Step 5, this is where the ribbon ties for the bottom of the pole openings should ideally have been installed. If you followed my improved sequence, they’re already securely sewn in. If not, now is the time to hand-sew them in place. These ribbons will allow you to tie the tent fabric firmly around the PVC poles, ensuring the tent remains stable and taut at its base.
Step 10: The Grand Assembly – Installing the Poles
The moment of truth! Carefully slide your PVC pipes (or conduit) into the newly created pole pockets. A vital tip: measure the finished length of your pole pockets after all sewing is complete, then cut your PVC pipes to match this exact length. This ensures a snug and perfect fit. Once the poles are in place, use the ribbon ties (from Step 9) to secure them firmly to the tent fabric. This creates a robust and stable structure for your DIY kids’ play tent.
And just like that, you’re all done! Your beautiful homemade play tent is ready for endless adventures.
Your Completed Play Tent: A World of Imagination Awaits!
Now it is time to play! Unfold your masterpiece and watch as it transforms any room into a magical world of imaginative play. Whether it’s a secret clubhouse, a quiet reading nook, or a base for epic adventures, this DIY kids’ play tent is sure to be a beloved addition to your home. It’s a testament to your creativity and a gift that will inspire countless hours of joy and exploration.
Care and Maintenance for Your DIY Play Tent
To ensure your beautiful homemade play tent lasts for years to come, proper care is essential. Since all fabrics were pre-washed, your tent is ready for regular cleaning. When it’s time for a refresh, simply remove the PVC poles. The fabric tent can then be machine washed on a gentle cycle with cold water and a mild detergent. For best results, air dry or tumble dry on low heat to prevent excessive wrinkling and maintain fabric integrity. Store the disassembled tent and poles in a dry, safe place when not in use, protecting it from dust and potential damage. This simple maintenance routine will keep your children’s play tent clean, fresh, and ready for countless more adventures!
Share Your Creations & Connect!
I would absolutely love to see the DIY kids’ play tents you create using this tutorial! Please share your projects and tag me on social media, or even better, send me photos! Your feedback is incredibly valuable, especially any suggestions for clarifying steps or improving the pattern further. Together, we can make this the ultimate resource for crafting a beautiful homemade play tent. Thank you for embarking on this creative journey with me!