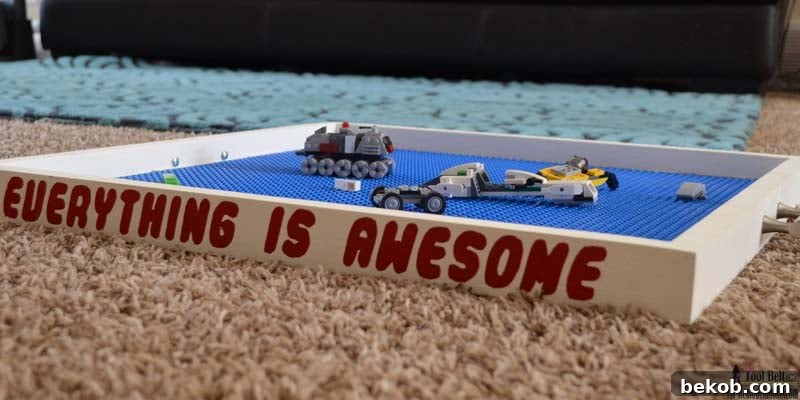
Build the Ultimate DIY LEGO Building Tray: A Creative Solution for Organized Play
Are you searching for the perfect way to keep your child’s LEGO creations organized, contained, and ready for imaginative play? Look no further! This comprehensive guide will walk you through creating a durable, versatile, and super easy DIY LEGO building tray. Ideal for enthusiastic builders of all ages, this custom tray provides a dedicated space for building, creating, playing, and proudly displaying their magnificent LEGO masterpieces. Say goodbye to scattered bricks and hello to a tidy, inspiring play area. This brilliant concept, initially inspired by Jaime Costiglio, is a game-changer for any LEGO-loving household.
How to Craft Your Own LEGO Building Tray: Step-by-Step Tutorial
Why Every LEGO Fan Needs a DIY Building Tray
A dedicated LEGO building tray offers numerous advantages that transform the building experience for children and parents alike. Firstly, it provides a contained environment, significantly reducing the chances of losing small bricks or having creations accidentally dismantled. This means fewer frustrations and more uninterrupted creative flow. Secondly, its portability allows kids to move their building projects from their bedroom floor to the living room, or even outside, without breaking down their progress. When playtime is over, the tray can be easily tucked away under a bed or in a closet, keeping your home neat and organized. This project is not just about building a tray; it’s about fostering creativity, promoting organization, and giving your child a treasured space for endless imaginative play. Moreover, the satisfaction of building something practical and beautiful with your own hands adds an extra layer of enjoyment to this rewarding DIY endeavor.

Gather Your Materials: Essential Supplies for Your LEGO Tray Project
Before you begin, ensure you have all the necessary tools and materials. Having everything ready will streamline the building process and make for a much smoother experience. Most of these items can be found at your local hardware store or online.
- 1″ x 2″ x 8′ Board (actual 3/4″ x 1 1/2″ x 8′): This piece of lumber will form the sturdy frame of your tray. Pine is a good choice for its affordability and ease of workability, but any common wood will do. Ensure it’s straight and free of major knots or defects for a clean finish.
- 1/2″ Plywood or MDF – need 20 1/8″ x 20 1/8″: This will serve as the base onto which your LEGO plates will be attached. Plywood offers excellent stability and screw-holding power, while MDF (medium-density fiberboard) provides a very smooth surface ideal for painting and is often more budget-friendly. Both are suitable choices.
- 1 1/2″ – 2″ Brad Nails: These nails are perfect for securely attaching the frame pieces to each other and to the plywood base. Using a brad nailer will make this step quick and easy, but you can also use a hammer and finish nails if preferred.
- 4 – 10″ LEGO Plates: These are the core of your building surface. We recommend using genuine LEGO base plates for optimal brick compatibility and durability. The 10″ x 10″ size is standard and provides ample building space when four are joined together. You can find these at most toy stores or readily available online (check current listings for LEGO plates).
- Wood Glue: Essential for strong, lasting joints between your wooden frame pieces. Always use a high-quality wood glue for durable construction.
- Multipurpose Glue for Plastic and Wood (e.g., Gorilla Glue, Epoxy, or Liquid Nails): This specialized adhesive is crucial for securely bonding the plastic LEGO plates to the wooden base. Ensure the glue is compatible with both materials and dries clear for a professional look. Read product instructions carefully for curing times and application methods.
- Sandpaper: Various grits (e.g., 80-grit, 120-grit, 220-grit) will be needed for smoothing rough edges and preparing the wood for finishing.
- Wood Filler: Perfect for concealing nail holes, minor gaps, and imperfections in the wood, creating a seamless surface.
- Paint/Stain: Choose a durable, child-safe paint or wood stain to finish your tray. Consider colors that complement your child’s room or their favorite LEGO themes.
- 2 Handles (Optional): Adding handles to the sides of the tray enhances portability, making it even easier for little hands to carry their creations.
Precision Cutting: Your LEGO Tray Cut List
Accurate cuts are key to a professional-looking and sturdy LEGO tray. Double-check your measurements before making any cuts to ensure everything fits together perfectly.
- 1 – 1/2″ x 20 1/8″ x 20 1/8″ Plywood or MDF: This is the main base piece. This dimension is specifically chosen to accommodate four 10″ LEGO base plates with minimal necessary gaps, providing an almost seamless building surface.
- 2 – 3/4″ x 1 1/2″ x 20 1/8″ Board: These two pieces will serve as the short sides of your tray’s frame. They will align flush with the edges of your plywood base.
- 2 – 3/4″ x 1 1/2″ x 21 5/8″ Board: These two longer pieces will form the long sides of the frame. Their length is calculated to overlap the ends of the short side pieces, creating strong mitered or butt joints at the corners and fully encompassing the plywood base for maximum stability.
Step-by-Step Guide: Building Your Ultimate LEGO Play Surface
Step 1: Preparing the Base and Attaching LEGO Plates
Begin by cutting your 1/2″ plywood or MDF to the precise dimensions of 20 1/8″ x 20 1/8″. Ensure the cut edges are smooth; a light sanding might be necessary. Before attaching the frame, it’s often easiest to glue the LEGO plates to the plywood base. This order isn’t strictly necessary, but it allows for easy access to the entire surface. However, the most critical part of this step is ensuring both the plywood and the LEGO plates are meticulously clean and free of dust, grease, or debris. Any residue can prevent the glue from adhering properly.
Apply a thin, even layer of your multipurpose glue to the wooden base where each LEGO plate will sit. Be careful not to use too much, as excess glue can seep out and affect the studs. Carefully press the four 10″ LEGO plates into the glue, arranging them in a 2×2 grid. A clever trick here is to use actual LEGO bricks to temporarily attach the plates together. This helps ensure proper alignment and maintains the tiny, crucial gap between plates that allows bricks to span across the seams without issue. Without this gap, your larger creations might not sit flat or connect properly. Once the plates are in place, apply even pressure across them using heavy books or weights. This ensures maximum adhesion and prevents warping as the glue dries. Allow the glue to cure completely according to the manufacturer’s instructions. Once dry, carefully inspect the edges and remove any excess glue with a craft knife or chisel, ensuring a smooth, clean surface for building.
Step 2: Assembling the Sturdy Frame
Now that your LEGO base is securely attached to the plywood, it’s time to build the frame. Start by applying a bead of wood glue along the short sides of the plywood base. Take your two 20 1/8″ frame pieces and nail them into place along these edges, making sure they are flush with the bottom of the plywood. Use your brad nails for this, spacing them evenly for a secure hold. Ensure the nails are driven straight to avoid splitting the wood.
Next, apply wood glue to the end joints of the newly attached short sides, as well as along the remaining two exposed edges of the plywood. Position the two longer 21 5/8″ frame pieces. These will butt up against the ends of the short sides, effectively encasing the plywood base. Nail these long side pieces to both the plywood and the ends of the short frame pieces, creating strong, stable corners. Wipe away any excess wood glue immediately with a damp cloth to prevent unsightly dried drips. Allow all the wood glue to dry completely, ideally for several hours or overnight, to ensure maximum bond strength before proceeding.
Step 3: Finishing Touches for a Professional Look
With the frame securely assembled, it’s time to refine your LEGO tray. Begin by removing any final traces of excess glue. Then, apply wood filler to all nail holes, minor cracks, and any blemishes in the wood. Don’t be shy; a slightly generous application can be sanded down. Once the wood filler is completely dry – which can take a few hours depending on the product and thickness – sand the entire tray until it is silky smooth. Start with a coarser grit sandpaper (e.g., 80-100 grit) to tackle any major imperfections, then move to a medium grit (120-150 grit) for overall smoothing, and finally, a fine grit (220 grit) for a truly professional finish. This meticulous sanding ensures a beautiful final result and a safe, splinter-free surface for your child.
Once sanded, thoroughly clean off all dust, and then it’s time for painting or staining. Choose a durable, non-toxic paint or stain that will stand up to enthusiastic play. For a vibrant look, consider a bright paint color. Amy, for instance, chose Americana Decor Lace paint, giving her tray a fresh and clean appearance. To add a personalized touch, you might stencil a fun phrase like “Everything is Awesome” (you can often find downloadable templates online or create your own with painter’s tape, as described in detailed stencil tutorials). For an extra layer of convenience, consider attaching a couple of drawer pulls or handles to two sides of the tray. This thoughtful addition makes it incredibly easy for kids to carry their projects around and for parents to slide the tray under a bed or into a storage space when not in use. The low profile of this DIY LEGO tray is one of its most practical features, making storage a breeze.
Customizing Your LEGO Tray: Make It Uniquely Yours
The beauty of a DIY project lies in the ability to personalize it. While the core functionality of this LEGO tray is excellent, you can take it a step further to truly make it special. Beyond painting and stenciling, consider adding a clear, protective topcoat over your paint for added durability, especially if the tray will see heavy use. You could also experiment with different wood stains to match existing furniture in your child’s room. For older children, you might involve them in the painting or decorating process, allowing them to choose colors or add their own artistic flair. Magnetic strips along the outer frame could hold small metal containers for sorted LEGO pieces, adding another layer of organization. The possibilities for customization are truly endless, limited only by your imagination, ensuring your LEGO tray is not only functional but also a unique piece of personalized art.
The Joy of Organized Play: Long-Term Benefits of Your LEGO Tray
Investing a little time and effort into creating this DIY LEGO building tray will pay dividends in the long run. You’ll not only provide a fantastic, organized space for your child’s creative endeavors, but you’ll also foster a sense of order and care for their belongings. This tray isn’t just a surface; it’s an invitation to build bigger, explore more complex ideas, and proudly display their achievements. Imagine less clutter, more focused playtime, and the sheer delight on your child’s face as they interact with their custom-built LEGO station. It’s a project that brings joy, functionality, and a touch of handmade charm to any home.
Discover More Inspiring DIY Projects from Our Talented Community
We believe in the power of community and sharing creative ideas. If you’ve enjoyed building this LEGO tray, we encourage you to explore other fantastic DIY projects from our fellow creators. Dive into these wonderful tutorials for more inspiration to beautify your home and spark new crafting passions!