
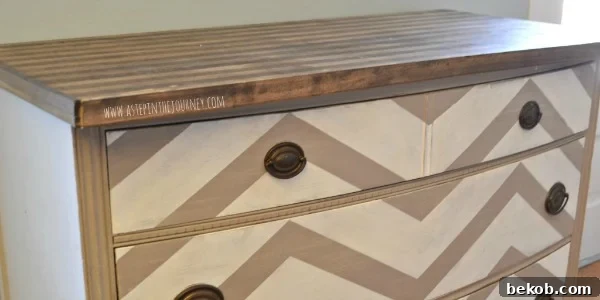
Transform Your Kitchen: From Drab Dresser to Dream Island Buffet with a Faux Butcher Block Top
The art of repurposing old furniture is a design trend that continues to capture hearts, and for good reason. There’s an undeniable satisfaction in breathing new life into a forgotten item, transforming it from shabby to chic, and giving it a fresh purpose within your home. The journey from “before” to “after” is not just about aesthetics; it’s about sustainability, creativity, and adding unique character that off-the-shelf items simply can’t match. Today, we’re thrilled to share an inspiring DIY project where a plain old dresser was ingeniously repurposed into a beautiful, functional kitchen island and buffet, crowned with an impressive faux butcher block countertop.
Unlock Creativity: Inspiring Dresser Repurposing Ideas
The versatility of an old dresser extends far beyond its original function. Seeing furniture reimagined for new uses is endlessly fascinating, and the possibilities are limited only by imagination. Here are a few creative examples of repurposed dressers that truly inspire home renovators and DIY enthusiasts:
Dresser Into Child’s Bookcase | Yankee Drawl
Transforming a dresser into a children’s bookshelf is a brilliant way to add organized storage to a nursery or playroom. The drawers can be removed or modified to create open shelving, perfect for displaying books and toys, making it both functional and charming.
Dresser into Bathroom Vanity | 1 More Than 2
A dresser can become an unexpectedly elegant bathroom vanity, offering unique character and ample storage for toiletries. With a little plumbing work and a new countertop, it adds a bespoke touch to any bathroom renovation.
Dresser into Outdoor Potting Bench | Jarden Designs
For garden enthusiasts, transforming an old dresser into an outdoor potting bench provides a practical and charming workspace. The drawers can store tools and seeds, while the top offers a sturdy surface for gardening tasks, blending functionality with rustic appeal.
Dresser into Kitchen Island with Bar Seating | Laughing at the Days to Come
A repurposed dresser can become a focal point in the kitchen as an island, especially when designed with an extended countertop for bar seating. This provides additional prep space, storage, and a casual dining area, perfect for small kitchens or open-plan living.
Dresser into Entry Bench | Chic Staging and Design
An old dresser can find new life as an elegant entry bench, offering a convenient spot to sit while putting on shoes and providing hidden storage for essentials. This transformation is both practical and a stylish way to greet guests.
Featured DIY Project: Repurposed Dresser to Kitchen Buffet
We’re incredibly excited to feature Laura Beth from A Step in the Journey, who masterfully transformed an old dresser into a stunning kitchen buffet. Laura Beth, known as LB to her friends, shares her passion for crafting, cooking, and navigating life’s adventures on her blog. Her approach to DIY is refreshingly honest and approachable, making even complex projects feel achievable. Today, she walks us through one of her most cherished transformations: the creation of this eye-catching chevron and faux butcher block buffet. This project is a testament to how creative vision and a bit of elbow grease can turn a discarded piece into a functional work of art for any kitchen.
The Humble Beginnings: Dresser’s Journey
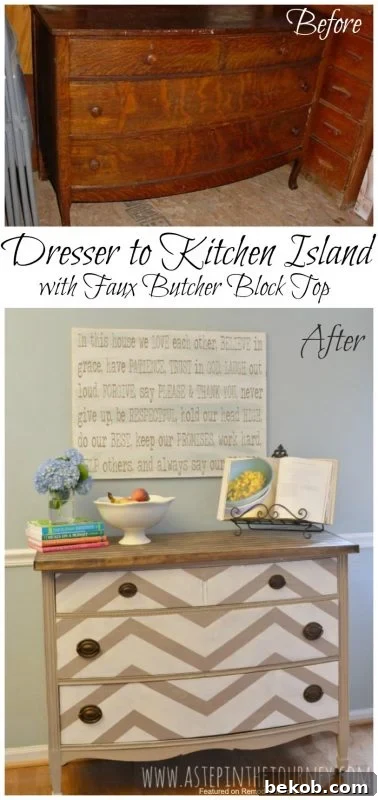
Three years ago, when my husband and I settled into our new home, we were fortunate to receive several hand-me-down furniture pieces from my aunt, including a sturdy dresser. Initially, this dresser served as a TV console, a common fate for many versatile furniture items. While I don’t have a pre-blogging era photo of its exact original state, it resembled the classic dresser shown below – possessing solid “bones” but clearly in need of a significant update.
Once our TV found a new home mounted on the wall, the dresser’s next iteration was as a kitchen island. This transition, however, wasn’t immediate. It first underwent a complete makeover. The entire piece received a thorough sanding to ensure a smooth surface for new paint. For the base color, I opted for a custom-mixed light brown/taupe shade, concocted from leftover brown and white paints. If Sherwin Williams were to name it, I’d affectionately call it “chocolate milk” – a warm, inviting hue that provides a perfect canvas for the decorative elements to come.
Mastering the Chevron Pattern: A Step-by-Step Guide
Adding chevron stripes to the dresser was the next exciting, albeit tricky, phase of the transformation. After a bit of trial and error, I developed a reliable method to achieve crisp, perfectly aligned chevron patterns. This technique requires patience and precision but yields incredibly satisfying results. Here’s a visual guide and detailed instructions to help you recreate this stylish look:
- Determine Your Pattern: First, decide on the number of peaks and valleys you want for your chevron pattern. As shown in the example, a common design features two peaks and one complete valley. This will guide your initial measurements.
- Establish Your Grid: To create a balanced look, find the exact vertical center of the surface you are painting and mark it with a straight line. Then, divide each half of the surface in two, creating four equally sized vertical sections. These lines will serve as your guides for the chevron points.
- Mark the Peaks: Begin at the top edge of your surface. On the two outermost vertical guide lines, place a dot every 6 inches (or your preferred consistent length) downwards. These marks will define the top points of your chevron peaks.
- Mark the Valleys: Now, focusing on the center line and the outer edges of your surface, measure down from your first row of peak markings. For the valleys, measure half of your original spacing (e.g., 3 inches if your peaks were 6 inches apart) and make a mark. Continue to mark every 6 inches (or your original peak measurement) along these lines. This staggered marking creates the distinct zig-zag.
- Apply Tape with Precision: This is where the magic happens. Use painter’s tape to connect your dots, forming the chevron lines. The crucial step here is consistency: you must choose to always place the tape either *above* or *below* each dot, and then apply this rule *every single time* you lay down a piece of tape. This ensures parallel lines and a crisp pattern.
- Time to Paint: With all your lines meticulously taped off, it’s time to apply your chosen paint color. Ensure even coverage and allow the paint to dry completely before carefully peeling off the tape to reveal your perfect chevron pattern.
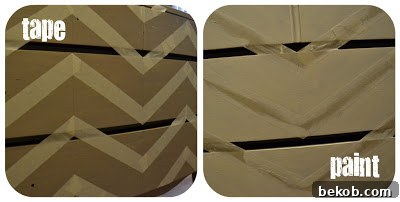
I sincerely hope these instructions clarify the chevron painting process! If, despite these detailed steps, you find yourself struggling with the intricate taping, remember that the popularity of the chevron trend means stencils are readily available and can offer a fantastic alternative for achieving this striking pattern. Now, let’s move on to crafting the impressive faux butcher block top.
Crafting a Custom Faux Butcher Block Countertop
Initially, I considered applying a glaze sealant to the dresser top to make it kitchen-safe, given its new role as an island. While I loved the initial look, I quickly discovered its impracticality – it attracted and held onto every spill and stain, making it unsuitable for a kitchen environment. This revelation prompted an additional, crucial DIY step: creating a durable and visually appealing faux butcher block countertop. This not only solved the functionality issue but also elevated the dresser’s aesthetic significantly.
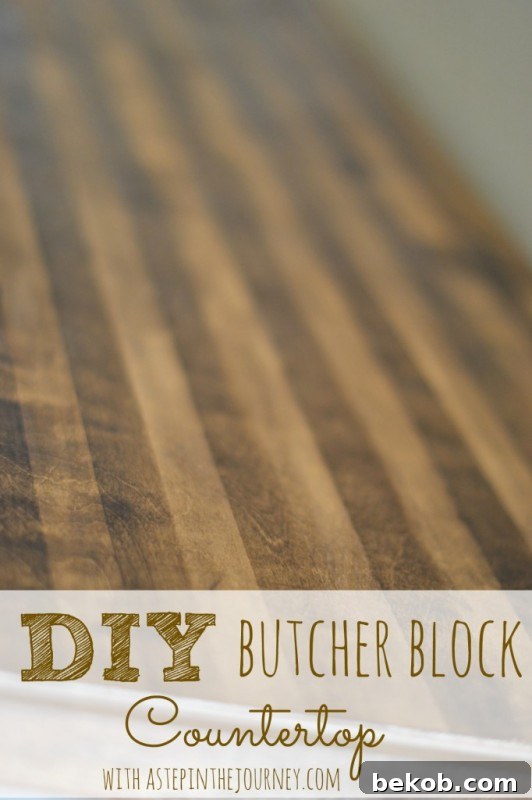
Here’s how I achieved the realistic butcher block effect for my dream island (now buffet):
Materials & Attachment
My first stop was Home Depot, my go-to for DIY supplies. I purchased a piece of sanded plywood, a cost-effective and versatile choice. A fantastic tip for any DIYer: Home Depot offers a cutting service! I provided them with the precise dimensions for my island top, adding an extra 1/2 inch to both length and width to create a neat 1/4 inch overhang on all sides. This small detail adds a professional, finished look. The plywood cost a mere $12, making this a highly budget-friendly upgrade. I then used liquid nails to securely attach the plywood to the existing dresser top and allowed it to dry overnight, ensuring a strong, lasting bond.
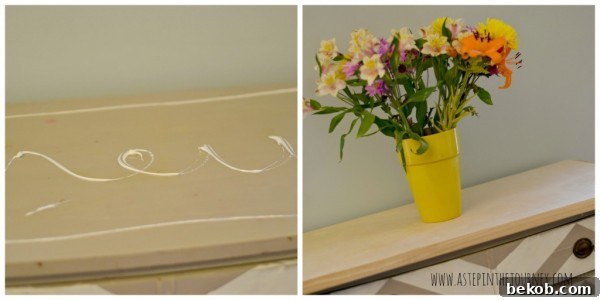
To finish the edges, I utilized leftover 1-inch wood trim from a recent closet remodel. This trim was also attached with liquid nails, and any small gaps or cracks were filled with wood filler for a seamless appearance. While clamps are ideal for holding the trim in place as it dries, a practical alternative like duct tape can work wonders if clamps aren’t available, providing sufficient pressure for the adhesive to set.
Staining for the Butcher Block Effect
The key to achieving the faux butcher block look lies in the staining technique. I began by applying a single, light coat of Minwax walnut stain over the entire new wood surface. It’s important for this initial layer to be less saturated than a typical stain application. I prefer using an old t-shirt or rag instead of a brush for staining, as it offers greater control and allows for a more even, natural finish. This base coat provides the underlying wood tone.
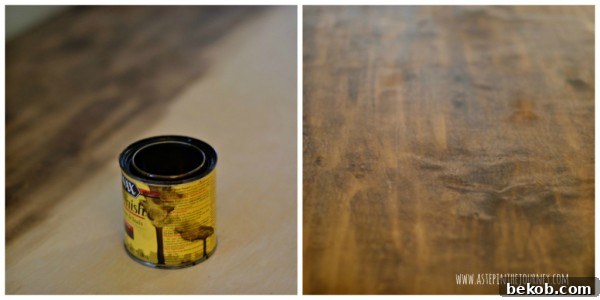
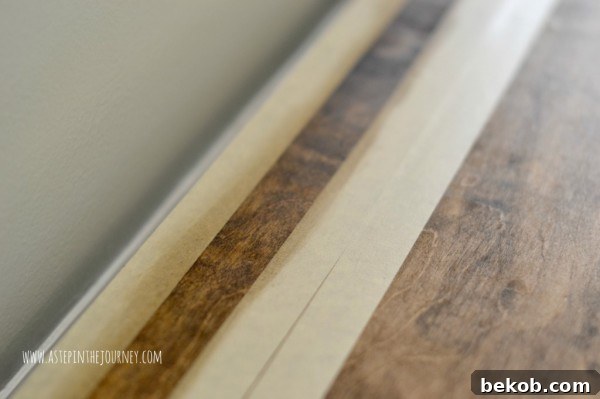
After allowing the initial stain to set according to the manufacturer’s directions, I proceeded to create the distinctive butcher block stripes. I used the width of painter’s tape to establish my stripe pattern. The method is simple yet effective: lay down three consecutive rows of tape, then carefully remove the middle piece. The open space between the remaining two pieces of tape is where you’ll apply a second, thicker layer of stain using your rag. This heavier application creates a darker, more pronounced stripe. Continue this process across the entire countertop, staining every other stripe to mimic the alternating grain patterns found in true butcher block.
Sealing for Durability
The final, crucial step is to apply several coats of polyurethane to seal and protect the faux butcher block top. This clear protective finish enhances durability, resists moisture, and makes the surface easy to clean. While I cannot definitively claim it is 100% food-safe (as I am not the FDA), it is perfectly suited for use as extra counter space, a serving area, or a stylish buffet. The transformation it brings to the kitchen is truly remarkable, adding warmth and a custom feel.
The Final Transformation: A Beloved Kitchen Buffet
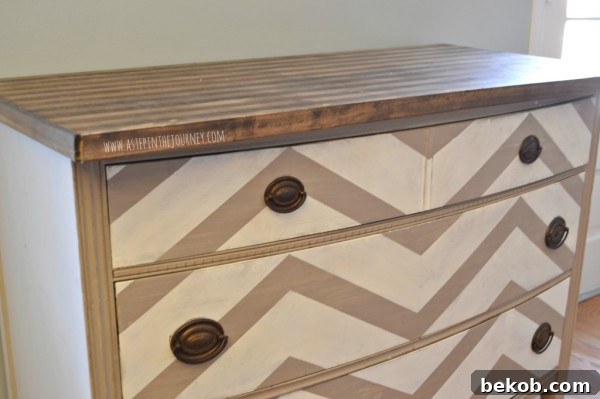
Given my uncertainty about using the surface for direct food preparation, I decided to officially designate this beautiful piece as a kitchen buffet rather than a primary island for chopping. And I must say, I believe it has finally found its perfect and permanent home. This project was truly a labor of love, representing one of my most satisfying DIY endeavors to date. What makes it even more rewarding is the minimal cost: since I already had the paint, stain, and polyurethane on hand, the entire transformation only cost me the $12 for the sanded plywood. For such a small investment, I now have a stunning, functional buffet that brings a smile to my face every time I walk into the kitchen.
Thank you for joining me on this creative journey! I encourage you to explore the world of furniture repurposing and discover the unique pieces you can bring to life. For more crafting, cooking, and DIY adventures, please stop by A Step in the Journey anytime. My door is always open!
LB, your creativity with the painted chevrons and perfectly stained wood stripes is truly captivating. The combination is simply stunning and brings such personality to the piece. Thank you immensely for sharing your ingenious project and inspiring countless others to look at their old dressers with fresh, imaginative eyes!