
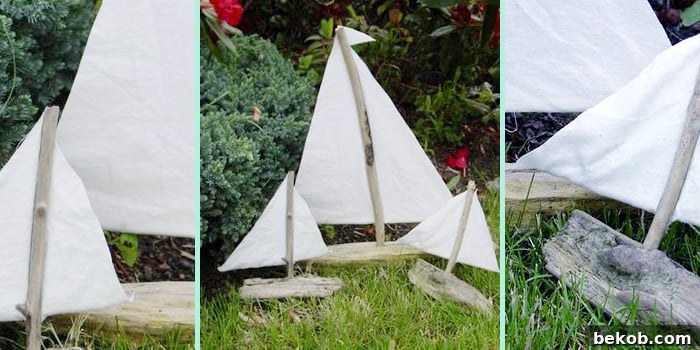
Craft Your Own Coastal Charm: A DIY Driftwood Sailboat Tutorial
There’s an undeniable allure to coastal living, a dream many of us share of a tranquil beach house where the rhythm of the waves dictates the day. Until that dream becomes a reality, why not infuse a touch of the seaside into your own space with charming, handcrafted decor? This project is exactly that—a delightful and surprisingly simple way to bring nautical elegance home. Imagine these adorable DIY driftwood sailboats gracing your shelves, tables, or even serving as unique centerpieces for a special occasion. They embody rustic charm and a relaxed, ocean-inspired aesthetic that is universally appealing.
This tutorial draws inspiration from a wonderful project originally shared by Rachel on Holy Craft, and we’re excited to expand upon her fantastic idea. These aren’t just decorative pieces; they’re conversation starters, symbols of wanderlust, and a testament to the beauty of natural materials transformed with a little creativity. Whether you’re an experienced crafter or a complete beginner, you’ll find this project both rewarding and enjoyable. Let’s embark on this creative voyage and craft something truly special!
Why Driftwood Sailboats? Embracing Natural Beauty and Sustainable Crafting
Driftwood holds a unique charm, each piece telling its own story shaped by currents, tides, and time. Its weathered texture and organic forms lend themselves perfectly to creating decor that feels authentic and connected to nature. Crafting with driftwood is not only aesthetically pleasing but also an eco-conscious choice, transforming discarded natural elements into beautiful works of art. These sailboats are incredibly versatile; they can complement a wide range of interior styles, from farmhouse chic to minimalist modern, adding a touch of serene coastal vibe wherever they are placed.
Beyond personal decor, these handmade sailboats make exceptional, thoughtful gifts. For instance, my sister-in-law and I recently created a fleet of these charming sailboats to celebrate my father-in-law’s 60th birthday. His milestone celebration called for something memorable, and given that his main gift was sailing lessons, a beach-themed gathering adorned with these nautical crafts was the perfect fit. The personal touch of handmade decor added an extra layer of warmth and festivity to the occasion, making the celebration truly unforgettable. You can customize them for any event, from baby showers to retirement parties, or simply as a token of appreciation for someone special.
Gather Your Treasures: Essential Materials for Your DIY Sailboat
One of the best aspects of this project is its reliance on readily available and often free materials. With just a little bit of beachcombing and a few common craft supplies, you’ll have everything you need to create your miniature fleet. The beauty of these sailboats lies in the natural imperfections of their components, so don’t strive for perfection – embrace the unique character of each piece of driftwood you find.
Supplies You’ll Need:
- Driftwood Pieces: These will form the base of your sailboats. Look for pieces that are relatively flat on one side for stability, and vary in size and shape for a diverse fleet. Aim for pieces roughly 4-8 inches long, but larger or smaller pieces can also work for different scales.
- Straight Sticks or Dowels: These will serve as your masts. Scout for long, skinny, and straight sticks on the beach, or use thin wooden dowels from a craft store. The length should be proportionate to your driftwood base, typically 6-12 inches.
- Muslin Fabric: A lightweight, plain fabric like muslin is ideal for the sails. Its natural texture complements the rustic feel of the driftwood. You can also experiment with other light fabrics like linen scraps, old tea towels, or even canvas for a sturdier look.
- Hot Glue Gun and Glue Sticks: Your indispensable tool for quick and secure assembly. Make sure you have plenty of glue sticks on hand!
- Drill and Drill Bits: Essential for creating a secure hole for the mast in your driftwood base. You’ll need a drill bit slightly smaller than the diameter of your chosen mast sticks.
- Measuring Calipers or Ruler: For precise measurements of your sticks and drill bits.
- Scissors: For cutting fabric.
- Pencil or Fabric Marker: For marking your sail shapes.
The Hunt for Driftwood: A Guide to Successful Beachcombing
My journey to gather materials began with a leisurely half-hour of beachcombing along the shores of the Pacific Northwest. There’s something truly therapeutic about searching for nature’s treasures, and I quickly accumulated most of the necessary supplies. I focused on finding a variety of driftwood pieces for the bases, envisioning how each unique shape would form a different sailboat hull. Simultaneously, I scouted for as many long, skinny, and straight sticks as I could find, knowing these would become the sturdy masts. The joy of finding the perfect piece, smoothed by the ocean and bleached by the sun, is a significant part of the crafting experience.
When collecting driftwood, remember to be mindful of local regulations. Some beaches have restrictions on removing natural materials. It’s always a good practice to take only what you need and leave the rest for others to enjoy. Once you’ve gathered your driftwood and sticks, give them a good rinse to remove any sand, dirt, or lingering salt. This initial cleaning will help prepare them for the drying process and ensure a cleaner crafting experience.
The Drying Dilemma: Preparing Your Driftwood for Crafting
Living in the Pacific Northwest, springtime often means everything is damp, and my freshly collected driftwood was no exception. To expedite the drying process and ensure my pieces were ready for crafting, I opted for a slightly unconventional method. I took my driftwood and sticks home, arranged them on cookie sheets, and baked them in the oven at 250 degrees Fahrenheit for approximately two hours.
While my intention was primarily to dry the wood, an unexpected benefit quickly became apparent: the oven treatment effectively cooked out any tiny critters that might have taken up residence in the wood. A definite “yummo!” for the bugs, not for me! However, in terms of drying efficiency, the oven didn’t seem to significantly speed up the process compared to air drying. In fact, the most memorable outcome was that my entire house began to smell like a very pungent beach on an exceptionally hot day – a unique aroma, to say the least! If you’re not in a hurry, air drying your driftwood in a well-ventilated area for several days or even weeks is often a gentler and less aromatic approach. Ensure the wood is completely dry before proceeding, as moisture can lead to mold or instability in your finished piece.
Precision and Power: Drilling the Mast Hole
With the driftwood prepped and dried, it was time for the more technical step: creating a secure base for the mast. This part requires a bit of precision, and frankly, some “man hands” can be quite helpful here! I sweet-talked my husband into assisting with this crucial step, and he readily took on the challenge.
Here’s how to ensure a snug and stable mast connection:
- Pair Your Pieces: Select a driftwood base and a mast stick that are well-matched in scale. Hold them together to visualize the finished sailboat.
- Measure with Precision: Using calipers or a ruler, carefully measure the diameter of your mast stick. This measurement is critical for selecting the correct drill bit.
- Choose the Right Drill Bit: Select a drill bit that is slightly *smaller* than the diameter of your mast stick. The goal is to create a hole that requires a tight fit, ensuring the mast stands securely without wobbling. If the bit is too large, the mast will be loose, requiring excessive glue or filler.
- Mark the Spot: On the top surface of your chosen driftwood base, mark the desired location for the mast hole. Generally, placing it slightly forward of the center creates a visually balanced sailboat.
- Drill Carefully: With a firm grip on the drill and ensuring the driftwood is stable (perhaps clamped down), carefully drill a hole into the driftwood base. It’s crucial to drill deep enough to provide stability for the mast but avoid drilling all the way through to the bottom of the driftwood. A depth of about half to two-thirds the thickness of the driftwood is usually sufficient. Take your time, apply steady pressure, and clear any sawdust as you go.
- Test the Fit: Once the hole is drilled, gently try to insert the mast stick. It should require a bit of force to push in, indicating a tight, secure fit. If it’s too loose, you might need to use more hot glue or try a slightly larger stick for that particular hole. If it’s too tight to insert, you may need to slightly widen the hole with the same drill bit or a slightly larger one, but do so incrementally to avoid over-drilling.
There’s a certain satisfaction in watching the raw materials come together, especially when the mast fits perfectly into its base. A little bit of engineering here makes all the difference in the final appearance and stability of your miniature vessel.
Crafting the Sails: Design, Cut, and Assemble
My apologies for not having detailed photographs of the sail-making process, but rest assured, it’s a straightforward step that allows for plenty of creative freedom. Each driftwood base and mast combination is unique, so the sails will need to be tailored to fit your specific creation. Don’t worry too much about geometric perfection; the casual, organic look is part of the charm.
Step-by-Step Sail Construction:
- Measure and Visualize: Hold your muslin fabric up to your assembled mast and driftwood base. Visualize how tall you want your main sail to be and how wide it should span. Generally, a sail that is about two-thirds the height of the mast and slightly narrower than the driftwood base works well.
- Cut Your Triangles: You’ll typically create two triangular sails for each boat: a larger main sail and a slightly smaller foresail (front sail).
- For the main sail, cut a large triangle from your muslin. One side of the triangle will run parallel to the mast. The other two sides will angle down, creating the classic sail shape. Don’t overthink the exact angle; a slightly irregular cut adds to the handcrafted appeal.
- For the foresail, cut a second, slightly smaller triangle. This one will typically be narrower and shorter than the main sail. You might find that simply making it a scaled-down version of your main sail works best. The goal is to create visual interest and depth with the two sails. I always try to make one sail just a bit smaller than the other to avoid a symmetrical, less organic look.
Geometry confession: I nearly failed geometry, so I won’t pretend to know what kind of triangles these officially are! Just aim for a shape that looks good on your mast.
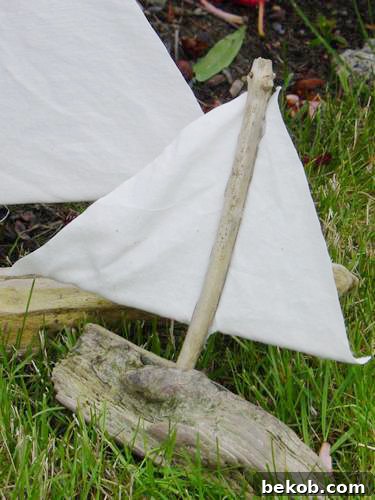
- Attach the Main Sail to the Mast: Place your larger sail triangle against the mast. The straightest edge of your triangle should align with the mast. Using your hot glue gun, run a thin but continuous bead of hot glue down each side of the mast (along the edge where the sail will attach). Quickly press the muslin sail onto the glue, ensuring it adheres smoothly and securely along the length of the mast. Hold it in place for a few seconds until the glue sets.
- Create the Boom (Bottom Spar): Take a smaller, skinnier stick (or a very thin dowel) that is almost the entire width of your main sail at its base. This will act as the “boom,” adding structure and weight to the bottom of the sail. Apply a generous line of hot glue along the bottom edge of your main sail. Carefully roll the bottom edge of the muslin over this small stick and press it firmly into the glue, encasing the stick within the folded fabric. Make sure to use enough glue to secure both ends of the stick and the fabric to the center of the mast where they meet. This gives the sail a nice, finished look and helps it hold its shape.
- Add the Foresail (Optional but Recommended): For the foresail, you can either attach it directly to the mast in front of the main sail, or for a more realistic look, you can attach its top corner to the mast a little higher up, and its bottom corner to the front of the driftwood base. A small dab of hot glue will usually suffice for these attachment points. This adds dimension and completeness to your sailboat.
The Finishing Touches: Bringing Your Sailboat to Life
Once all your sails are securely in place and the glue has dried, take a moment to admire your creation. Each sailboat will have its own unique personality, reflecting the natural variations of the driftwood and your personal touch. I particularly love how casual and wonderfully beachy they turn out, perfectly capturing that relaxed coastal vibe. The blend of rugged wood and soft fabric creates a beautiful contrast, making these little boats feel both artisanal and authentic.
Displaying Your Masterpieces:
- Shelves and Mantels: Arrange a collection of varying sizes and shapes for a dynamic display.
- Centerpieces: Group several sailboats together on a tray with sand or pebbles for a stunning table centerpiece.
- Bathroom Decor: Add a serene touch to your bathroom counter or windowsill.
- Kids’ Rooms: A charming addition to a nautical-themed nursery or playroom (ensure they are out of reach for very young children).
- Gifts: Package them beautifully with a handmade tag for a truly special present.
Tips for Success and Creative Variations
To ensure your driftwood sailboats are as charming and sturdy as possible, consider these additional tips:
- Stability Check: Before gluing anything permanently, ensure your driftwood base sits stably on a flat surface. If it wobbles, you might need to sand down a small portion of the bottom for better balance.
- Fabric Choices: While muslin is excellent, feel free to experiment. Light canvas can offer a sturdier, more rugged sail. Old maps, patterned fabric scraps, or even burlap can create different effects. For a truly unique look, try painting or stenciling simple designs onto your muslin sails.
- Embellishments: Add small details like a tiny flag at the top of the mast (cut from fabric or paper), a piece of twine wrapped around the mast, or even miniature shells glued to the base for extra texture.
- Safe Drilling: If you’re not comfortable using a drill, a sturdy awl and some patience can help create a pilot hole, which you can then widen carefully. Alternatively, some craft stores offer pre-drilled driftwood pieces.
- Glue Alternatives: While hot glue is fast and convenient, super glue or a strong wood adhesive can offer a more permanent bond, especially for the mast. Just allow adequate drying time.
It is inexpensive and easy!
Conclusion: Set Sail on Your Next Crafting Adventure!
Crafting these DIY driftwood sailboats is more than just a project; it’s an opportunity to connect with nature, unleash your creativity, and bring a piece of the serene coastline into your home. It’s wonderfully inexpensive, incredibly easy, and yields results that are both charming and unique. Every piece of driftwood has a story, and now you can add another chapter by transforming it into a delightful miniature vessel.
Whether you’re decorating your own space, searching for the perfect handmade gift, or simply looking for a relaxing and rewarding craft, these sailboats are an excellent choice. So, next time you find yourself by the shore, keep an eye out for those beautiful pieces of driftwood. You might just be collecting the starting materials for your very own fleet of coastal treasures. Happy crafting, and may your creative sails always be full!