The steps below follow the order of the work for this furniture project.
Submitted by Add Some Paint
This desk has been a huge project for Jeff and I. We bought it about a month ago from the Goodwill on “Half Off Saturday.” (The Goodwills here in AZ sell everything half off, every other Saturday!)
You can barely see Jeff at the back of the line. He’s in the maroon shirt, walking. Jk, Jeff is (behind that man) in a yellow shirt, enjoying an egg McMuffin, far left.
Here is the desk. It was originally $24. We got it for $12. Score! It weighed about a million pounds. But in my mind, that means it is a quality piece of furniture. At this point we had no option how we would get it to the third floor of our apartment.I really think we found a treasure. It is an old Executive Writers Desk! For all we know, if could be like this one, and worth $7,500!
We worked on the project at Jeff’s parent’s house, in their workshop. After we cleaned the desk, drawers included, we sanded the whole desk with a medium grit sandpaper. After, we went over everything with low grit (220) to make it smooth. As you will see, we planned on just staining the entire desk to give it a new classic look.
To stain, use a cloth or dry sponge and apply the drippy stain WITH the grain. Let it dry for about 30 minutes, then wipe off any excess stain left behind. We chose a “red mahogany” stain that looked striking. Well, it looked striking everywhere besides the top. Even after wiping off the excess stain, parts of the top just wouldn’t soak up the paint. Our guesses why the top looked so bad stained: because we didn’t sand well enough, because the desk was too worn in those areas, it is so hot here and it wouldn’t dry. Unfortunately, we couldn’t get over how bad it looked, so we had to think of something to do with the top. Inspired by our repainted dresser, we decided to paint the top a different color.
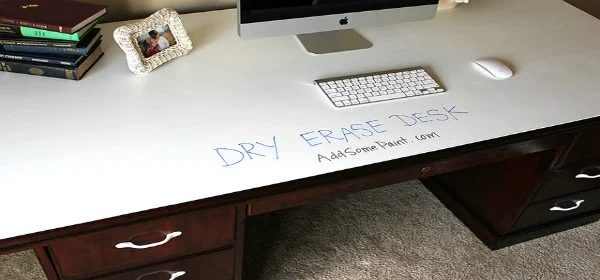
This is where creative minds came together, and our sister Chelsea came up with DRY ERASE PAINT for the top. I had no option this stuff even existed, but my sister-in-law told us all about it. We were sold.
We had to get that blotchy stain off the top, so we sanded it down again. Sanded it until there was no stain left, and it was bare wood. Then we wiped it clean with a damp towel, and let it dry.
I read every review of this Dry Erase Paint on Amazon, and Home Depot, and found that people either hated it (didn’t work), or they loved it (it worked great). I think the application (see directions below) is key here. There are other expensive dry erase paint brands out there, but I chose Rust-Oleum (found at Home Depot) because of the affordability, it’s roughly $23.
I also read that if the dry erase paint is expired (or over 2 years old) it will NOT work. According to reviews, the expiration date is stamped on the box as shown below.
The number after the first letter indicates the year is was made. So, if the number reads “1″ (like mine does), then it was made in 2011. If it says “9″ or older, I would stay away because chances are, it was made in 2009 or earlier. I would encourage you to buy it in the store (not online) because then you can read the expiration date on the box.
We masked the top with tape, and, as instructed by the box, painted the desk with a latex primer. We used Kilz 2. For all of the painting we used an ultra-dense mini roller to ensure smooth application.
We applied 3 coats of primer. Keep in mind, primer is not meant to be well fitted, it is just for a bottom coat. It is okay if there are streaks or uneven spots.
Once the primer was completely dry (we waited a couple days because we were out of town), we started the Dry Erase Paint process. Mix Part A into Part B. Once the paint has been mixed/opened, you must apply all your coats within 2 hours. The paint will not work (it won’t erase) if you paint after that point. Also, you must wait at least 20 minutes for the paint to dry in between coats. We recommend at least 3 coats of paint, we did 4 coats.We poured a portion of the paint into a paint tray and applied our first coat. We rolled long strokes on the desk surface. The paint is thin. Then we waited about 30 minutes, and repeated, and repeated, and repeated.
Booty shot!
After the third coat of paint, it was completely dark, no one was home… so we went skinny dipping. Shh, don’t tell Jeff’s parents. In my defense, it was 107 degrees (at 10:30 pm), we needed to cool off.
Once all your coats are on, you must wait at least 3 days for the paint to cure. Don’t put any markings on it until it is completely dry. We waited 5 days to be safe.
When it was time to bring the desk home, we recruited our brother-in-law Corbin (aka The Hulk) to help us carry this beast up 3 flights of stairs to our apartment. Did I mention this thing weighs a bazillion pounds?
Then we purchased the hardware (white pulls) from Home Depot for about $2.60 a pop. We had to drill new holes because no one sells 4 inch pulls anymore.
And now for the unveiling!!
It really does erase! I couldn’t believe it!
Before and After:
That is so cool! What a creative option! look at some of other great office projects here:
Closet Office Inspiration
Computer Closet Office Remodel
Updated Style Home Office Reveal
Bekob Note: The original guest shared this walkthrough from AddSomePaint(.)com. The site has since been shut down and redirected maliciously, so the links have been removed as of 5 Feb 2021.