
Transform Your Closet Doors into Treasure Chests: A DIY Pirate Room Makeover Guide
Ahoy there, mateys! At long last, we’re thrilled to bring you a much-anticipated update on our epic Pirate Room project! After what felt like an eternity (and yes, we won’t disclose precisely how long it took), we’ve finally hoisted the sails and completed the transformation of the closet doors. Some might call it crazy, but we believe true treasures lie in the intricate details.
Today, we’re not just revealing the final look; we’re sharing every detail of our journey, including the inevitable learning curves and valuable lessons we picked up along the way. Think of it as navigating treacherous waters – there were a few storms, but we emerged victorious with a bounty of knowledge!
When we last left off, these humble doors were nothing more than plain, uninspired white panels. For a room destined to be a swashbuckling pirate’s lair, they were, frankly, quite boring. A true pirate’s quarters demand character, authenticity, and a touch of rugged charm. We envisioned something that looked like it belonged on a grand galleon or guarding a secret stash of gold.
This image shows the original, bland white closet doors, awaiting their transformation.
Step 1: Laying the Foundation with a Rich Base Coat
Our journey began with a fundamental step: painting the doors a deep, chocolate brown. This wasn’t just any brown; we aimed for a rich, earthy tone that would serve as the perfect foundation for our faux wood grain finish. Luckily, we stumbled upon some leftover “oops” paint our sister had on hand, making this crucial first step absolutely free – and who doesn’t love a good freebie?
The paint itself was a flat finish, which was ideal since it would act solely as the base coat, allowing the subsequent layers to build upon it without any unwanted sheen interfering with our faux finish technique. This initial layer is vital, as it’s the color that subtly peeks through the glaze, giving the illusion of natural wood grain. We carefully applied an even coat, ensuring full coverage to create a consistent canvas for the next stages of our artistic endeavor.
Here, you can see the initial application of the chocolate brown base coat, transforming the white door.
Once painted, the doors took on the appearance of giant, inviting Hershey bars. (Yes, my mind often drifts to chocolate – it’s a hazard of the trade!) After allowing them ample time to dry thoroughly, we moved on to preparing them for the next intricate layer. Using high-quality painter’s tape, we meticulously taped off the middle, top, and bottom sections of each door. This precision is key to achieving crisp, defined panels, mimicking the construction of traditional wooden doors. Each section would later receive its own unique graining, adding depth and realism to the overall effect.
The doors, now a rich brown, are precisely taped off, creating distinct sections for the faux wood grain application.
Step 2: Gathering Your Arsenal for the Faux Wood Grain
To embark on the faux wood grain journey, we assembled a specific set of tools and materials designed to replicate the organic patterns of natural wood. Precision and the right products make all the difference in achieving a convincing finish.
- Black and Brown Craft Paint: These two colors form the core of our glaze mixture, allowing us to achieve varied depths and tones that mimic aged timber.
- Valspar Clear Mixing Glaze: This is the magic ingredient! A clear mixing glaze extends the drying time of the paint, making it workable for longer and enabling the graining tool to create its distinctive patterns smoothly.
- Wood Graining Tool: This specialized tool, with its unique comb and rocker patterns, is essential for pulling through the glaze to reveal the base coat beneath, forming the characteristic lines and knots of wood grain.
Pictured are the essential items for our faux wood grain project: black and brown craft paints, clear mixing glaze, and the specialized wood graining tool.
Step 3: Crafting the Perfect Glaze Mixture (The Unscientific Way)
Mixing the glaze might sound like a precise science, but in our workshop, it was more of an intuitive art form. We started by generously pouring brown craft paint into an ice cream bucket – yes, a trusty old ice cream bucket is perfect for this! Then, we added a smaller amount of black paint, aiming for a darker, more aged wood appearance. Finally, the clear mixing glaze was incorporated. The key here isn’t exact measurements but rather achieving the right consistency and depth of color. If it’s not quite right, don’t fret; simply adjust by adding more paint or glaze until you reach your desired hue and workability.
The glaze should be thick enough to hold the graining pattern but fluid enough to allow the tool to glide smoothly. This “eyeball” method allows for flexibility and customization, ensuring the finished look perfectly matches your vision for weathered, pirate-ship-worthy doors. Once thoroughly mixed, you’re ready to dive into the exciting world of faux painting!
This image shows the concoction of brown and black craft paint mixed with clear glaze in a recycled ice cream bucket, prepared for the faux wood graining process.
Step 4: The Art of Graining – Technique and Direction
With our glaze ready, the real magic began. We applied a section of the glaze directly onto the door. Working quickly before it dried, we then took the wood graining tool and pulled it through the wet glaze. The secret lies in a gentle rocking motion as you drag the tool. This subtle movement is what creates the irregular, organic patterns that mimic natural wood, from subtle growth rings to convincing knots. It’s an incredibly satisfying process to watch the grain emerge!
Here, the wood graining tool is being applied with a gentle rocking motion over a freshly glazed section of the door, creating natural wood patterns.
Understanding Wood Grain Direction for Authenticity
For a truly convincing faux wood finish, it’s essential to mimic the direction real wood grain would naturally flow. Imagine a traditional paneled door; the grain in the vertical stiles would run vertically, while the grain in the horizontal rails would run horizontally. Our diagram below illustrates this principle:
- Red Arrows: These indicate the direction in which the wood graining tool was pulled for each respective section. Notice how the grain flows vertically in the larger panels and horizontally in the cross-sections.
- Green Numbers: These denote the order in which we tackled each section. Working systematically helps manage the drying time of the glaze and maintain a consistent look.
- Blue Lines: These mark where painter’s tape was strategically placed while glazing sections #1 through #3. Using tape here provides a perfectly crisp, straight edge, giving the finished panels a professional, polished appearance.
It’s crucial to remove the painter’s tape *before* you begin glazing section #4. This prevents any potential damage to the freshly applied glaze and ensures a seamless transition between sections.
This helpful diagram clarifies the precise direction of wood graining for each door section, the recommended application order, and the strategic placement of painter’s tape to achieve professional results.
Learning from Our First Faux Graining Mistake
Even seasoned DIYers make mistakes – and I’m certainly no exception! My first significant blunder occurred after glazing the initial sections. In an attempt to achieve perfect lines, I tried to re-tape over the areas I had just glazed to work on subsequent sections. Do NOT do this! Even after waiting for what I thought was sufficient drying time, the tape, upon removal, cruelly ripped off portions of my newly applied faux finish. It was incredibly frustrating, undoing precious work.
While waiting an entire day might allow the glaze to set completely, my impatience got the better of me. The best advice here is to simply use a steady hand when working on section #4, or any section adjacent to a freshly glazed area where tape would be disruptive. Trust your precision; it’s less painful than touching up a damaged finish!
The faux wood graining process continues, with the tool being expertly drawn across a door panel, bringing the texture to life.
After a good amount of trial and error, here’s what the door looked like once this faux graining step was completed. The transformation from plain white to what appeared to be richly textured wood was already remarkable. Along this journey, I gathered some invaluable tips that I believe will save you a lot of potential headaches and help you achieve a truly professional-looking finish:
Essential Tips for Perfect Faux Wood Graining:
- Master the Gentle, Long Rock: When using the graining tool, resist the urge to rock it quickly or abruptly. My initial attempts resulted in doors that looked obviously fake, riddled with too many unnatural “knots.” Instead, aim for long, fluid, and gentle rocking motions. This technique creates a more realistic, elongated wood grain pattern. If you do make a mistake or don’t like a section, don’t despair! Simply re-glaze that area and try again. The beauty of glaze is its extended workability.
- Apply Minimal Pressure: The goal is to allow the darker glaze to sit predominantly on the surface, with small, strategic amounts of the lighter base coat “peeking through.” Applying too much pressure will scrape off too much glaze, revealing too much of the base coat and diminishing the illusion of depth. A light touch is key to achieving that subtle interplay of colors characteristic of natural wood.
- Step Back and Evaluate Frequently: It’s easy to get lost in the details when you’re up close. Periodically step back a few feet from your work. This broader perspective allows you to see the overall effect, assess the consistency of your grain, and make any necessary adjustments to your technique before proceeding too far. This habit significantly improves the final outcome.
- Practice on the Less Visible Areas First: If you’re new to faux graining, start with the back of the doors or an inconspicuous area. This “practice zone” allows you to get a feel for the tool, the glaze consistency, and your rocking motion without the pressure of potentially spoiling a highly visible section. Once you’ve developed confidence and perfected your technique, move on to the more prominent parts of the doors.
- Utilize the Comb Part for Edges and Cross-Cuts: For the edges of panels and areas where real wood grain would naturally show a “cross-cut” (like the ends of a board), use the comb-like edge of your graining tool. This creates finer, more uniform lines that beautifully mimic the appearance of cut wood fibers, adding another layer of authenticity to your faux finish.
A detailed view of the door panel showcasing the freshly applied faux wood grain, highlighting the texture and color variations.
Another close-up shot revealing the intricate and realistic details achieved with the faux wood graining technique.
Step 5: The Clear Coat Conundrum – A Tale of Tears and Triumph
After standing back and admiring our meticulously crafted faux wood grain for a good while, the next crucial step was to protect our hard work with a clear coat. We chose Minwax Polycrylic Protective Finish in a satin sheen, aiming for a durable yet subtle finish that wouldn’t detract from the realistic wood texture. This step sounds straightforward, right? Not so fast! This is where our DIY journey took an unexpected and highly emotional turn, leading to moments of frustration and valuable lessons.
I began by applying the first coat using some leftover polycrylic from a previous bathroom project. It went on smoothly and looked perfectly fine. The can suggested three coats for optimal protection, but I decided two would suffice. However, fate had other plans. I ran out of the product just as I started the second coat on the very first door. Determined to finish that Saturday night, I rushed to Walmart and purchased a new can for $16.22.
Upon returning home, I eagerly applied the final coat. As it dried, my heart sank. The finish was unequivocally, glaringly glossy. It looked absolutely terrible, completely ruining the subtle, natural look of our faux wood grain. I was devastated, believing all my hard work had been wasted.
My initial thought was that I had purchased a mislabeled can. The section done with the first can had dried to a beautiful satin, while this new can yielded an unforgiving high gloss. I was furious and ready to call the manufacturer to demand “justice.” The thought of having to sand off that ultra-shiny finish, risking damage to the delicate faux paint underneath, filled me with dread. I just knew I’d have to start all over again.
Since it was Saturday, I had to endure an agonizing weekend, waiting until Monday to make that fateful call. Every piece of wood I encountered around the house seemed to taunt me with its perfectly satin finish. (Yes, I realize talking to wood might sound concerning, but such was my despair!)
The Minwax Polycrylic Protective Finish in satin sheen, a crucial product for protecting our DIY project.
The Minwax Revelation: Stirring, Shelf Life, and the Last Coat
If you’re reading this and feeling my pain, don’t worry – the Minwax customer service team truly saved the day! It turns out my assumption about a mislabeled can was incorrect, but the problem was rooted in something far simpler, yet easily overlooked.
The key difference between a gloss and a satin finish is a “flattening agent” added to the satin product. This agent, being heavier, tends to sink to the bottom of the can over time. The solution? You need to stir the product *extremely well* and *often* to ensure this agent is evenly distributed. (And remember: stir, don’t shake, as shaking introduces air bubbles!). While the can *does* instruct you to stir, I hadn’t realized the sheer duration required – the helpful representative suggested stirring for a solid three to five minutes, something I hadn’t done.
Adding to my woes, I also discovered that the new can I purchased was four years old! You can imagine just how thoroughly settled that flattening agent would have been at the bottom. The representative also kindly taught me how to read the date code on the top of the can for future reference – a valuable lesson in itself!
Perhaps the most relieving piece of information I gleaned from that call was that I didn’t necessarily have to sand off the glossy finish entirely. The professional explained that the *last* coat applied is the one that reflects the light and determines the final sheen. This meant hope for my doors!
Armed with this newfound knowledge, I returned to Walmart, exchanged the ancient, settled can for a fresh one with a much newer date code. Back home, I performed a light sanding – a standard practice between coats for optimal adhesion – and then, meticulously, I stirred the new product for a full five minutes (yes, I timed it!). With renewed hope, I applied the final, properly stirred coat to the doors, and waited. The next morning, I was greeted with glorious, perfect satin finishes on all four doors. Success! The moral of this prolonged clear coat saga is crystal clear: when it says “stir,” it means STIR, thoroughly and often!
A collage showcasing the stunning transformation of the closet doors with their newly applied faux wood grain finish.
Step 6: Crafting Authentic Pirate Studs on a Budget
With the faux wood grain and a perfect satin finish complete, our doors were nearly ready to set sail. However, to truly embody the rugged aesthetic of a pirate ship or a treasure chest, they needed authentic-looking iron studs. The challenge? Real iron studs typically range from $1.50 to $3.00 each. With four doors, each requiring 16 studs, we were looking at a whopping 64 studs in total. A quick calculation revealed a staggering cost of $90 to $192 just for the studs – a figure well outside our carefully planned budget. This was a clear call for creative, budget-friendly ingenuity!
Our solution came in the form of 1-inch wood plugs or buttons, readily available at Lowe’s in bags of six. The entire batch of 64 plugs cost us approximately $20, resulting in a remarkable saving of $70 to $170! This significant saving fueled our determination to make these simple wood pieces look authentically like wrought iron.
My wonderful partner, Les (who shares my delightful brand of DIY madness), took on the meticulous task of transforming these humble wood plugs. He carefully sanded about 30 flat spots on the head of each plug using a belt sander. This crucial step gives them a hand-forged, slightly imperfect look, mimicking the hammered texture of real iron studs. Next, he spray-painted them a deep black, ensuring complete coverage. To add a protective layer and a subtle metallic sheen, he then hand-painted each one with a coat of *properly stirred* satin clear coat. While I might be pictured contributing to this laborious task, Les was the true hero, painting well over 60 of these tiny treasures!
Les diligently working on transforming plain wood plugs into rustic faux iron studs, showcasing the sanding and painting process.
The transformation was impressive. Pictured below are the wood plugs in various stages: fresh out of the package, after Les’s careful sanding, and finally, finished with black paint and a protective satin clear coat. This was entirely Les’s project, and seeing his dedication and the amazing results filled me with immense pride.
A visual comparison displaying the raw wood plugs, the plugs after sanding, and the final result of the faux iron studs after painting and clear coating.
Step 7: Precision Installation of Studs and Handles
With our custom faux iron studs ready, it was time for the nerve-wracking installation. Les, ever resourceful, created a “high-tech gauge” – essentially a scrap piece of wood with a nail – to precisely mark the placement for each stud on the doors. This simple tool ensured uniform spacing and alignment, critical for a professional finish.
Next came drilling the holes. This step, while necessary, was undeniably scary! Making permanent holes in our beautifully finished doors required a steady hand and courage. We experienced a small learning curve here too: on our last door, Les, perhaps a bit too comfortable with the process, didn’t notice that the drill bit had pierced through the backside. But fear not, for “touch-up” paint is a lovely thing and easily remedied the minor mishap!
After drilling, Les meticulously used his thumb to clean up any “fuzzies” or splintered wood around the edges of the holes, ensuring a clean seating for each stud.
The closet door now features neatly pre-drilled holes, ready for the installation of the faux iron studs.
Using his fingers, Les applied a small amount of wood glue to each stud and gently popped them into their designated holes. It’s crucial to wipe away any excess glue immediately before it dries, to maintain a clean finish around each stud. The result was a dramatic visual impact, transforming the doors with an industrial, aged aesthetic.
This image shows the process of applying glue to the back of the faux iron studs before carefully inserting them into the pre-drilled holes on the door.
The final touch was to add appropriate handles. We opted for sturdy gate handles, which perfectly complemented the rustic, pirate-themed aesthetic. These handles were secured using lag screws. To maintain the seamless look, we carefully painted the heads of the lag screws to match the black finish of the handles and studs, ensuring every detail contributed to the overall theme.
Close-up of the gate handle installation, showing the lag screws with their heads meticulously painted to blend with the overall design.
The Grand Reveal: Our DIY Pirate Closet Doors!
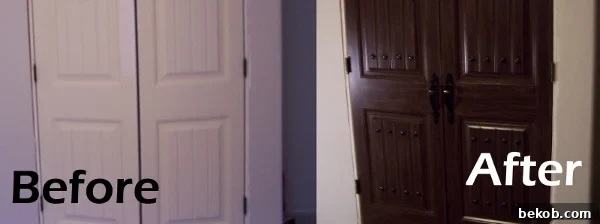
After weeks of planning, painting, problem-solving, and a healthy dose of determination, our pirate-themed closet doors are finally complete! The transformation is truly remarkable, far exceeding our initial expectations. From plain, unassuming white panels to rugged, character-filled doors that look like they belong on a ship sailing the high seas, this DIY project has added an unparalleled level of immersion to our Pirate Room.
A striking before-and-after comparison showcasing the dramatic transformation of the closet doors into a pirate-themed masterpiece.
Detailed Close-Ups: Appreciating the Craftsmanship
The beauty of this project truly lies in the details. Up close, you can appreciate the intricate faux wood grain, the subtle variations in color, and the handcrafted texture of the faux iron studs. Each element works in harmony to create an illusion of aged, sturdy timber, perfectly suited for a pirate’s hideaway. The combination of the dark brown base, the carefully applied glaze, and the custom studs creates a depth and realism that would be impossible to achieve with off-the-shelf doors.
A collage presenting various close-up shots of the completed pirate closet doors, highlighting the intricate details of the faux wood grain, studs, and handles.
What do you think of our pirate doors? We’d love to hear your thoughts! Have you embarked on any similar DIY adventures with unexpected learning curves? Share your stories and tell us if our experiences and tips have been helpful for your own projects. Sympathy and camaraderie in the world of DIY are always welcome!
The Unbeatable Value: Our DIY Savings Breakdown
Now for my favorite part of any DIY story: the cost savings! According to a friendly associate at Lowe’s, purchasing four custom doors with a similar aesthetic (whether solid wood or not) could have set us back anywhere from $800 to $2000. That’s a significant investment, especially for a themed room.
Our DIY approach, however, allowed us to achieve this high-end look at a fraction of the cost:
- Doors:
- Two doors sourced from the Habitat for Humanity ReStore: $20
- Two slightly damaged doors from Lowe’s (deeply discounted): $57
- Paint and Clear Coat: $24
- Gate Handles: $20
- Wood Buttons (for faux studs): $20
- Miscellaneous Supplies and Door Framing Wood: $40
Grand Total for all four doors: $181!
That’s an incredible saving, ranging from $619 to $1819! It truly exemplifies the power and reward of tackling projects yourself. We are absolutely thrilled with how they turned out, and the satisfaction of knowing we created them on such a tight budget is immense.
A full view of the magnificent, finished pirate-themed closet doors, now a proud centerpiece of the Pirate Room.
I truly believe these doors look pretty good, especially considering the ordeal and the incredible savings. We put a lot of effort and love into this project, and we’d love to hear your thoughts in the comments below!