
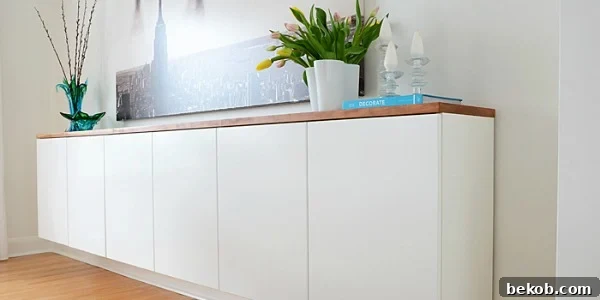
Welcome to an inspiring journey into modern home decor, where functionality meets minimalist elegance. Today, we’re thrilled to showcase a breathtaking modern space centered around a truly remarkable piece of furniture: a DIY floating sideboard. This stunning creation not only elevates the aesthetic of any dining room but also offers incredible versatility and smart storage solutions. Dive in with us as we explore how a single, thoughtfully designed element can transform an entire room, reflecting contemporary style and personal flair.
The Undeniable Appeal of a Modern Sideboard
A sideboard, also often referred to as a buffet or credenza, is much more than just a piece of furniture; it’s a foundational element that can define the style and ambiance of your room. Its surface offers a canvas for decorative displays, while its interior provides essential storage. The beauty of a well-chosen sideboard lies in its adaptability. It can be easily redecorated to reflect changing styles, evolving seasons, or simply your mood. Whether you prefer a bold statement or subtle elegance, a sideboard can anchor your decor and bring considerable life to a space.
To illustrate this versatility, let’s look at how various styles of sideboards can influence a room’s character:
Inspiration Gallery: Sideboards That Define a Room
A Swell Place to Dwell
This exquisite piece from A Swell Place to Dwell exemplifies the timeless appeal of mid-century modern design. Its clean lines and warm wood tones evoke a sense of nostalgic sophistication, seamlessly blending classic charm with contemporary living. Such a sideboard acts as a focal point, grounding the room with its inherent elegance and offering both display and storage functionalities, making it perfect for those who appreciate design heritage.
A Friendly Home
For those drawn to a more organic and inviting aesthetic, this “gigantic rustic sideboard” from A Friendly Home proves that size and texture can make a powerful statement. Its robust presence and natural wood finish instantly add warmth and character to the space. Rustic sideboards are perfect for farmhouse, industrial, or eclectic interiors, providing not just storage but a cozy, lived-in feel that welcomes guests and family alike.
The House of Wood
Functionality takes center stage with this bar cabinet sideboard by The House of Wood. Beyond its visual appeal, it’s designed to serve a specific purpose, making it ideal for entertaining. This example highlights how sideboards can be customized to fit unique lifestyle needs, transforming from a simple storage unit into a dedicated beverage station or a display for curated collections. Such specialized pieces add both utility and a touch of bespoke luxury to any home.
Now, let’s turn our attention to the star of our feature. We’re incredibly excited to introduce our guest, Anu from Nalle’s House, who will guide us through the creation and styling of her exquisite DIY floating sideboard.
DIY Floating Sideboard: A Scandinavian Modern Masterpiece
by Anu of Nalle’s House
Hello! I’m Anu, the creative mind behind Nalle’s House. As a mom to two wonderful boys and our beloved golden retriever, Nalle (a Finnish word meaning “teddy bear”), my life is certainly full! Our family’s Finnish heritage deeply influences my design philosophy, leading to a strong appreciation for Scandinavian modern style. I find immense joy in crafting and undertaking DIY projects around our mid-century ranch, continually infusing our spaces with that distinctive clean, functional, and aesthetically pleasing Scandinavian touch. Some of my favorite past projects include our compact yet efficient mini mudroom, the striking living room art pieces (which you can discover here and here), and even charming crafty endeavors like this personalized brag book. I’m absolutely delighted that Cassity invited me to share the details of my dining room floating sideboard project with all of you.
Materials You’ll Need for Your DIY Floating Sideboard:
Here’s a detailed list of the components we used to bring our vision to life:
- IKEA Cabinets: Three 36″ x 24″ IKEA “over the fridge” cabinets. We chose those with the clean Applad doors for their minimalist aesthetic. These cabinets come with their own mounting rails and essential hardware, simplifying the installation process.
- Custom Wood Top: A unique piece of black cherry wood, custom-planed to dimensions of 9 feet wide, 12 inches deep, and 1 inch thick. Opting for a quality wood top adds a luxurious and custom feel to the entire piece, contrasting beautifully with the sleek white cabinets.
- Wood Screws: Essential for securely attaching the cabinets to one another and fastening the exquisite wood top to the cabinet frames.
- Fine Grit Sandpaper: For achieving a perfectly smooth finish on your custom wood top, preparing it for sealing and enhancing its natural beauty.
- Waterlox Finish: A high-quality sealant for finishing the wood top. Waterlox is known for its durable, water-resistant properties, bringing out the wood’s natural grain and providing long-lasting protection.
Step-by-Step Construction Guide:
- Prepare Your Custom Wood Top:
The first and arguably most impactful step is getting your wood top planed to the precise dimensions for your sideboard. For those in the Toronto area, we highly recommend visiting Century Mill. They offer a fantastic selection of wood species, making the process of finding our beautiful black cherry piece an enjoyable experience. Our 9-foot cherry wood top cost under $100 planed, which is an excellent value. If budget is a primary concern, choosing an alternative wood like poplar could significantly reduce the cost while still providing a sturdy and attractive surface.
A well-planed piece of wood typically requires only a light sanding with fine-grit sandpaper to achieve a perfectly smooth surface. We aimed to simply seal and enhance the inherent beauty of our cherry wood, so we applied several coats of Waterlox. This product not only protects the wood but also deepens its natural color and grain, resulting in a rich, durable finish that will stand the test of time.
- Mount Your Cabinets to the Wall:
Next, it’s time to install the IKEA cabinets. We used three 36″ x 24″ “over the fridge” cabinets with Applad doors. These are designed to be mounted using IKEA’s standard kitchen mounting rails, which simplify the process immensely. Given the 9-foot length of our sideboard, we required two rails. One rail was easily cut to the desired length using a hacksaw. Installing IKEA cabinets is remarkably straightforward: the key is to ensure your mounting rail is perfectly level. Once the rail is secure and level, the cabinets simply hang onto it, automatically aligning themselves for a perfectly level installation. We mounted our cabinets at a height of 8 1/2 inches from the floor, resulting in a finished sideboard top that sits at 33 1/2 inches from the floor – a comfortable and aesthetically pleasing height for a dining room.
- Connect the Cabinets:
After the cabinets are securely mounted to the wall, the next step is to connect them to each other. This is done from the inside of the cabinets using the screws provided with the IKEA hardware. This internal connection ensures structural integrity, making the entire sideboard unit a single, cohesive piece.
- Attach the Wood Top:
With the cabinets firmly in place and connected, it’s time to add your beautiful wood top. This is achieved by screwing upwards from the inside of the cabinets into the underside of the wood top. Ensure that the screws used are appropriate for the thickness of your wood top to prevent them from penetrating through the top surface. This method creates a seamless and secure attachment, concealing all hardware for a clean, floating appearance.
- Enjoy Your Beautiful New Sideboard!
With the construction complete, step back and admire your handiwork! You’ve just created a stunning, custom-designed floating sideboard that will serve as a functional and stylish centerpiece in your dining room for years to come. Now, the fun part begins: decorating and utilizing its storage capabilities.
Anu’s Expert Design Tips for Your Own Floating Sideboard
Creating a custom piece like a floating sideboard allows for immense personalization. Here are some key considerations to keep in mind when designing a sideboard that perfectly fits your space and style:
1. Thoughtful Cabinet Selection is Key: The choice of cabinets profoundly impacts the final look and feel of your sideboard. I opted for the “over the fridge” IKEA cabinets because their slightly shorter height compared to standard wall cabinets allowed the sideboard to feel more like a custom, built-in piece rather than just an assembly of kitchen units. This subtle difference in height can make the entire piece feel bespoke and intentionally designed for your specific space.
2. Harmonize with Adjoining Rooms: Consider the existing finishes and styles in rooms that are open to or adjacent to your dining area. Our kitchen and living room both open into the dining room, so it was crucial to select cabinet finishes that complemented both spaces. We maintained a cohesive aesthetic by choosing the same plain white doors that are used on our kitchen drawer fronts and pantry doors, as well as the white flat-front credenzas in our living room. This creates a harmonious flow and a sense of unity throughout the open-plan living area.
3. Let Your Overall Room Style Guide Finishes: Your sideboard should be an extension of your room’s overarching design theme. As seen in the photo below, we opted for a wood top that sits perfectly flush with the cabinet fronts, creating an incredibly clean and minimalist look. This choice beautifully complements our mid-century modern Saarinen Tulip Table and Executive Chairs. We also chose to leave the cabinet doors unadorned, not only to maintain this clean aesthetic but also to make them toddler-proof, a practical consideration for a busy family home. However, if your room leans towards a more traditional or decorative style, adding elegant hardware or switching out the door fronts to something with a decorative profile (like shaker or raised panel) can completely transform the piece to suit your desired aesthetic.
4. Determine the Optimal Height: The height of your sideboard is crucial for both aesthetics and functionality. We aimed for a height slightly above our dining table but noticeably lower than our kitchen countertops. This was a deliberate choice for a couple of reasons. Firstly, it ensures the sideboard is at a comfortable height for placing and retrieving serving dishes without straining. Secondly, by establishing a clear height difference between the sideboard and the dining table, both horizontal surfaces gain their own visual prominence within the room, preventing the space from feeling monotonous and enhancing the distinct roles of each furniture piece.
5. Thoughtful Styling and Decoration: Once your sideboard is built, the fun of styling begins. We started with a large-scale print, a striking black and white vintage plane, which perfectly ties together the modern and vintage elements prevalent in our room. The accessories were deliberately kept minimal to allow the artwork sufficient space to breathe, particularly important in a room with standard ceiling height. Our chosen accessories, including art glass, an Aalto vase, and Sarpaneva candlesticks, are either vintage or modern pieces that reflect the overall Scandinavian-inspired feel of the room, creating a cohesive and curated display.
The Transformation: Before & After
Just in case you were curious about the journey of this dining room, here’s what it looked like before our modern floating sideboard project. This photo captures the space when we first viewed our house, showcasing the previous tenant’s belongings: