
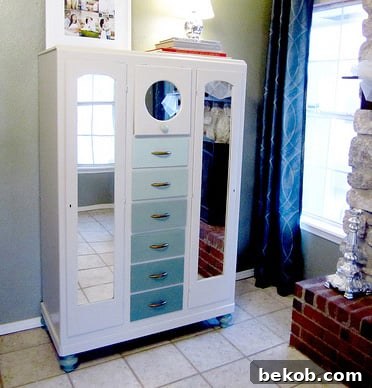
Ombre Armoire Makeover: A Detailed Before and After Transformation
contributed by A Little Paint
In the vibrant, sometimes overwhelming, tapestry of everyday life, especially when juggling commitments like weekend babysitting, the notion of embarking on a significant personal project can feel like a distant dream. Yet, there’s an unparalleled joy and sense of accomplishment that stems from transforming something forgotten into a beloved, functional piece of art. This article unveils precisely such a journey – a captivating ombre armoire makeover that breathed new life into a neglected furniture find, proving that even with a packed schedule, a sprinkle of dedication and a dash of creative ‘chaos’ can lead to truly spectacular results.
Many busy individuals might wonder how one manages to undertake ambitious DIY furniture transformations amidst the delightful demands of children. For me, the secret often lies in strategically simplifying the chaos. Picture this: a well-timed deployment of delicious candy, captivating movies, and the irresistible charm of puppies. With the little ones happily engaged and immersed in their own world of entertainment, a precious window for creative pursuits magically appears. This allows for those moments of therapeutic escape into the realm of sanding, painting, and envisioning the boundless possibilities for discarded treasures. This particular weekend, despite being fully immersed in childcare, I was determined not to let the opportunity for a significant personal achievement slip through my fingers. My focus was firmly set on a promising vintage armoire renovation that had recently caught my discerning eye on an online marketplace.
The Thrill of the Hunt: Sourcing Our Ombre Canvas
My journey to crafting this unique piece began on a rather ordinary Thursday, which quickly became extraordinary when an intriguing posting appeared on Craigslist. It was an armoire – a large, somewhat imposing piece of furniture that, despite its current state, exuded immense potential. As with most pre-loved items, it came with its own set of challenges, primarily logistical ones. Between my daytime work commitments and the inconvenient fact that my car simply wasn’t built for spontaneous furniture hauling, acquiring such a substantial item on a whim was out of the question. This is where my truly amazing mom, my dedicated “furniture rescue” agent, stepped in. Her willingness to assist in these ambitious projects is absolutely invaluable, making her an indispensable partner in my creative endeavors. Once she confirmed the successful pickup, a wave of eager anticipation washed over me. The rest of the day was filled with a buzzing excitement, a keen readiness to finally meet this “monster” of a furniture piece and wholeheartedly embark on its much-anticipated furniture upcycling journey.
Assessing the “Before”: Unveiling a Diamond in the Rough
Let me issue a friendly disclaimer right from the start: if your aesthetic leans towards keeping furniture in its original, unpainted glory, then this article might challenge your sensibilities. For here, we unapologetically celebrate the transformative power of paint! Our newly acquired armoire, while possessing a wonderfully unique silhouette and undeniable charm, was far from pristine. It bore the unmistakable, textured marks of a well-loved (and perhaps overly-loved by a feline friend) home, suffering from what I affectionately diagnosed as “cat scratch fever.” Regrettably, in the flurry of excitement and vision, I committed a common DIYer’s blunder: I neglected to capture a truly representative “before” photograph. My camera screen often plays mischievous tricks, leading me to believe I’ve perfectly framed the crucial details, only to find them blurred or out of focus later on. But rest assured, despite the lack of crystal-clear initial photos, the piece was visibly in dire need of significant attention and a fresh perspective, making it the quintessential candidate for a dramatic DIY furniture transformation. Its imperfections were not flaws, but rather invitations for a creative reimagining.
*An initial glimpse of the armoire, hinting at its hidden potential and the journey ahead.*
Prepping for Perfection: Sanding, Repair, and the Addition of Elegant “Feet”
The foundation of any truly successful painted armoire project lies in meticulous preparation. This stage is far more than just a cursory wipe-down; it’s about diligently creating the optimal canvas for the upcoming finish. The armoire underwent a thorough and rigorous sanding process, a crucial step designed to meticulously smooth out the existing “cat scratch fever” and ensure impeccable paint adhesion. This often-laborious, but absolutely essential, endeavor guarantees a professional-grade, resilient, and durable end result. Beyond the imperative surface restoration, I decided the armoire required a subtle yet impactful alteration to its overall stature. It presented as somewhat squat, almost “suffering from a little man complex,” as I playfully observed. The solution? Attaching a charming set of new feet. This seemingly minor addition not only gracefully elevated its height but also introduced an entirely new dimension of elegance and refinement to its overall profile. This thoughtful, structural change dramatically enhanced its visual presence, making it feel more substantial, sophisticated, and perfectly poised for its grand reveal.
*The armoire, post-sanding and proudly showcasing its newly elevated stature with elegant feet.*
*A closer inspection of the prepped surface, smooth and impeccably ready for its vibrant transformation.*
Embracing “CHAY-OS”: My Unique Approach to Creative Furniture Painting
When I dive into my creative process, particularly for an exciting creative furniture painting endeavor, I’ve lovingly dubbed my method “CHAY-OS.” It’s an endearingly unscientific, yet remarkably effective, approach that consistently works like a charm. This philosophy champions spontaneity, resourcefulness, and even celebrates the occasional happy accident. It’s not uncommon to find that when other items inadvertently stray too close to my painting zone, they might just receive an impromptu coat of paint from a stray brushstroke. Did you happen to notice the white bowl subtly sporting a new hue in some of the background photos? This delightful phenomenon occurs far more frequently than I (or indeed, anyone observing) would anticipate, adding a unique, quirky charm that becomes an integral part of my artistic narrative.
While the term “CHAY-OS” might conjure images of disarray, at its heart, it’s a testament to adaptability and ingeniously maximizing available resources – qualities that are the bedrock of truly budget-friendly home decor. This flexible, problem-solving mindset proved absolutely invaluable when it came to selecting the perfect paint for our ambitious ombre armoire makeover. It allowed me to pivot from an initial setback to a fortuitous discovery, transforming a potential hindrance into a key component of the project’s success.
*My ‘CHAY-OS’ method in action – where creative energy sometimes spills onto unexpected canvases!*
The Serendipitous Paint Discovery: Exterior Semi-Gloss for the Ultimate Win!
My initial expedition for the perfect custom-mixed paint hit an unexpected snag. A trip to the local hardware store proved utterly fruitless due to the absence of the paint mixer operator. Returning home empty-handed, and surveying my collection of dried-up paint buckets, I found myself on the cusp of postponing the entire furniture upcycling endeavor. However, as often happens in the world of DIY, fate intervened with a delightful surprise. Tucked away, I stumbled upon a forgotten can of paint, a remnant thoughtfully left behind by the previous homeowners. Labeled simply “back door,” this exterior semi-gloss paint was an absolute godsend. Given that my own back door had long ago been cheerfully painted a vibrant turquoise, this leftover paint was perfectly liberated for a new, exciting purpose.
And what an extraordinary solution it proved to be! The exterior semi-gloss finish delivered a truly magnificent result. Its inherent robust durability meant I could completely bypass the tedious and time-consuming step of applying a separate protective top coat, saving me invaluable time and effort. This was a significant advantage, transforming the DIY furniture transformation project into a far more efficient undertaking. The hardy nature of exterior paint also imbues the armoire with an impressive layer of resilience, ensuring it will gracefully withstand the rigors of daily use and the passage of time. While the whimsical thought of utilizing this “exterior” paint outside crossed my mind momentarily – purely in jest, of course! – rest assured, this exquisitely transformed piece has absolutely no plans to venture beyond the cozy, curated confines of my home. It stands as a powerful testament to how genuine resourcefulness and an open, adaptable mind can lead to surprisingly effective and truly unique custom furniture finish solutions, often from the most unexpected places.
Crafting the Perfect Base Hue for the Ombre Effect
While the “back door” paint provided an excellent starting point, for the main body of the armoire, I envisioned a slightly lighter, softer, and more inviting hue. With a touch of artistic intuition and careful precision, I meticulously mixed in a measured amount of white paint until the color reached its desired lightness and vibrancy. This carefully crafted custom blend would serve as the impeccable foundation, allowing the upcoming gradient paint technique to truly radiate and captivate. Beyond simply painting the main structure, I was eager to introduce an element of extraordinary visual interest to this painted armoire project. The armoire’s existing wooden details, while pleasant, weren’t intricate enough to warrant traditional highlighting techniques. Therefore, I opted for a bold, contemporary, and visually striking approach: painting the six prominent drawers with an enchanting ombre effect, promising a dynamic and modern aesthetic.
The Art of the Ombre: Crafting a Seamless Gradient Transformation
The ombre effect, characterized by its elegant and gradual blend of colors from dark to light (or vice versa), is a sophisticated yet surprisingly achievable gradient paint technique that instantly infuses immense visual interest and contemporary flair into any furniture piece. For this armoire, my artistic objective was to create a harmonious and captivating color progression across its six drawers, meticulously transitioning from the deepest, richest shade at the bottom to the lightest, most ethereal hue at the top. Here’s a detailed, step-by-step guide on how to meticulously recreate this stunning look:
- Strategic Color Selection: Begin by identifying your darkest desired color. This will be the base for your gradient. For each subsequent drawer moving upwards, you will systematically incorporate white paint (or a progressively lighter version of your original base color) to achieve the desired gradient effect. In my case, having already slightly lightened my original “back door” paint, I used that custom hue as the starting point for the darkest, bottommost drawer.
- Impeccable Drawer Preparation: Prior to any painting, ensure all your drawers are immaculately clean, thoroughly sanded, and, if deemed necessary, properly primed. Crucially, remove all existing hardware to ensure an unblemished finish.
- Precise Gradient Mixing:
- Generously paint the bottom drawer with your darkest, unadulterated color.
- For the second drawer, carefully pour a measured portion of your darkest paint into a separate, clean container. To this, add a controlled, small amount of white paint. Mix thoroughly until you achieve a shade that is distinctly, yet subtly, lighter than the first. If precision is paramount, diligently record your mixing ratios for perfect future replication!
- Systematically repeat this meticulous mixing process for each subsequent drawer, progressively adding more white paint with each step. The artistic challenge lies in creating discernible, yet gentle, shifts in color intensity between each individual drawer. The ultimate goal is to achieve a smooth, visually appealing, and progressive lightening effect.
- Masterful Paint Application: Apply thin, consistently even coats of your custom-mixed paint to each drawer surface. Allow ample drying time between each coat, which is vital for preventing drips and ensuring a smooth finish. Utilize a premium-quality brush or a fine-nap roller to achieve the smoothest possible application. While the primary ombre is achieved drawer-by-drawer, for an even more seamless illusion, you could apply a slightly heavier coat at the bottom of each drawer panel and skillfully feather it upwards with less paint.
- Achieving Optimal Coverage: Depending on the specific paint type you’ve chosen and your desired level of opacity, you may find that two to three coats per drawer are necessary to achieve a rich, uniform, and vibrant color.
- Consider a Protective Top Coat (Contextual): While my fortunate use of exterior semi-gloss paint brilliantly negated the need for an additional top coat, if your project utilizes interior paints or popular chalk paints, the application of a clear protective sealer (such as wax, polycrylic, or polyurethane) is not merely recommended, but highly essential to adequately protect and preserve your exquisite new finish.
The culmination of this careful process was truly captivating – a custom furniture finish that profoundly transformed the once-drab drawers into an undeniable work of art. The ambitious ombre armoire makeover was beautifully taking its ultimate form, powerfully demonstrating the remarkable impact and potential of a thoughtfully executed gradient paint technique. Each drawer now contributes to a visually arresting narrative of color and light.
*The stunning finished armoire, doors closed, revealing its captivating ombre drawer design and modern aesthetic.*
*A closer look at the intricate gradient paint technique, highlighting the seamless color transitions.*
*Opening up to reveal the impressive storage capabilities of this beautifully repurposed furniture piece.*
The Transformed Armoire: A Masterpiece of Functional Art for Your Home
The newly completed ombre armoire transcends its original purpose; it is no longer merely a piece of furniture, but a profound statement piece. The captivating gradient effect meticulously applied to its drawers creates a decidedly modern, artistic focal point that effortlessly elevates the entire aesthetic of any room it graces. Beyond its undeniable visual allure, the armoire concurrently offers an abundance of practical storage solutions, rendering it exceptionally functional. It is perfectly suited for a myriad of organizational needs, from neatly tucking away linens and clothing to housing intricate craft supplies, or even serving as a charming and unconventional alternative pantry. The sheer volume of storage it provides is nothing short of awesome, deftly addressing both sophisticated style and essential practicality with equal finesse. This striking before and after furniture transformation stands as a powerful exemplar of the immense potential inherent in dedicated home decor DIY projects, proving that beauty and utility can coexist in perfect harmony.
*Ample and beautifully organized storage within the skillfully painted armoire.*
*The finished armoire, a truly vibrant and indispensable addition to any discerning living space.*
Future Embellishments and Inspiring Your Next DIY Adventure
While the armoire, in its current state, is undeniably gorgeous and perfectly functional, the restless spirit of creativity perpetually brews new ideas. My immediate next steps for this magnificent piece involve meticulously painting the insides of the cabinet. This subtle yet significant detail will provide an even more polished, cohesive, and luxurious look upon opening. Furthermore, I am actively contemplating the addition of some carefully selected, vibrant fabric to adorn the back panels of the doors. This would introduce an unexpected, delightful pop of pattern and tactile texture, revealing itself charmingly whenever the doors are opened. This additional layer of personalization would further elevate this furniture upcycling triumph into a truly bespoke item. A dedicated shopping excursion to the fabric store is most certainly on the very near horizon!
This comprehensive ombre armoire makeover serves as a potent and inspiring reminder of the incredible, often untapped, potential held within old, seemingly neglected furniture pieces. With a clear vision, a generous dash of creativity, and perhaps a healthy dose of “CHAY-OS,” you possess the power to transform utilitarian items into bespoke works of art that profoundly reflect your unique style and personality. Beyond the tangible benefits, upcycling is far more than merely saving money or contributing to environmental sustainability; it is about infusing your living space with character, weaving compelling stories into your decor, and creating items that resonate deeply with your personal aesthetic. So, I urge you to look around: what forgotten piece of furniture in your home is eagerly awaiting its very own DIY furniture transformation? Gather your paints, embrace your inner artist, and prepare to create something truly extraordinary and uniquely yours. Happy painting, and may your next project be as rewarding as this one!