
Hello, creative community! I’m Ananda from A Piece Of Rainbow, and I’m thrilled to share a fantastic DIY project with you today. My passion lies in crafting unique and functional pieces for the home, and this particular project is designed to tackle a common challenge while adding a touch of modern elegance to your space.
If your desk often resembles a battlefield of pens, pencils, and craft supplies, you’re not alone. We all crave an organized workspace, but desk space is a precious commodity. That’s precisely why this DIY wall-hanging pen holder is a game-changer! It’s a remarkably simple and accessible project that not only liberates your desktop from clutter but also introduces a distinctive, modern decorative element to your wall. Imagine a perfectly tidy surface, with all your essential writing tools neatly suspended, ready for whenever inspiration strikes.
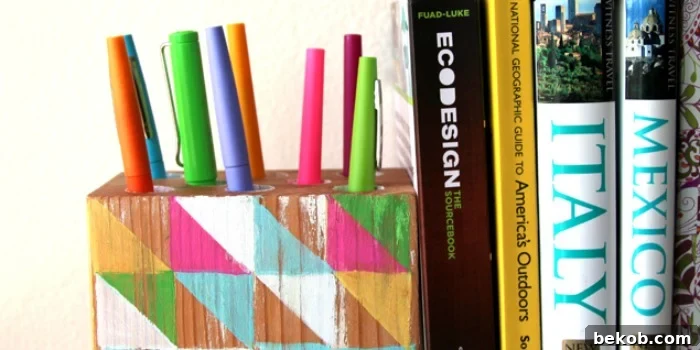
This project is more than just a pen holder; it’s a stylish statement piece that elevates your home office, craft room, or creative corner. Its sleek design and functional simplicity make it an ideal addition for anyone looking to optimize their space with handmade charm. Beyond its primary purpose, its robust construction and aesthetic appeal allow for surprising versatility. For those who possess an enviable level of organization (a trait I confess not always to share!), this piece can effortlessly transition from a wall organizer to a chic desk accessory, or even serve as a rustic yet modern bookend, adding character to any shelf or table.
The inspiration for this ingenious wall-hanging pen holder struck serendipitously. My brilliant husband first sparked the idea, envisioning a practical yet artistic solution for our own desk clutter. The opportunity to bring it to life presented itself when I was visiting a construction site for a project we had designed. I noticed a substantial chunk of 4″x6″ cedar post being trimmed off, destined for disposal. It was a true “aha!” moment. I promptly inquired, “Hi! Are you throwing that out?” The response was swift and generous: “Yes. You want it?? Here!” And just like that, with a piece of salvaged wood and a spark of creativity, our bespoke wall-hanging pen holder was conceived. This project is a wonderful testament to how reclaimed materials can be transformed into something beautiful and incredibly useful, breathing new life into what others might consider waste.
How to Make a Modern Wall-Hanging Pen Holder: A Step-by-Step Guide
Ready to create your own functional work of art? This DIY modern wall-hanging pen holder is an enjoyable project that yields impressive results. Follow these detailed steps to craft a unique organizer that reflects your personal style.
Gather Your Materials and Tools
Before diving into the creation process, ensure you have all the necessary items at hand. Selecting quality materials will contribute to the durability and aesthetic appeal of your finished pen holder.
- Wood Block: A piece of 4″x6″ (or a similar size that suits your aesthetic and desk supplies) wood, cut to approximately 6″ tall. Cedar is excellent for its natural beauty and workability, but any sturdy timber like pine, oak, or even reclaimed pallet wood can be adapted.
- Paint & Stencil Supplies (Optional): Acrylic or chalk paint in your desired colors. Card stock, heavy paper, or thin plastic sheets for creating custom stencils. Painter’s tape will also be useful for crisp lines.
- Drill: A standard power drill, either corded or cordless, will be essential.
- Drill Bit: A 5/8″ drill bit is a good starting point, as it accommodates most standard pens and markers. However, consider the “chubbiness” of your preferred writing tools and adjust the drill bit size accordingly for a snug fit.
- Sandpaper: Assorted grits (e.g., 80-grit for initial shaping/smoothing, 120-grit for general sanding, and 220-grit for a fine finish).
- Felt Pads & Strong Adhesive: Self-adhesive felt pads are ideal, but if you have plain felt, a robust wood glue or super glue will work to attach them securely.
- Sawtooth Hanger & Nails: A small sawtooth picture hanger, typically found in picture hanging kits, along with the tiny nails provided.
Step 1: Mark Your Drilling Points
Precision is key for a visually appealing end result. Begin by carefully marking the exact center points for each hole on the face of the wood block where your pens will reside. Using a ruler and pencil, divide the surface into a grid or desired pattern. Aim for an even distribution that allows ample space for each pen, typically ensuring at least 1/2 inch between the edges of the drilled holes. This initial planning stage is crucial for the overall aesthetic of your DIY desk organizer.
Step 2: Ensure Proper Spacing
To confirm that your marked holes are not too close together, a simple trick is to cut out small paper circles the same diameter as your drill bit (in our case, 5/8″). Place these paper circles over your pencil marks. This visual check allows you to adjust the spacing as needed, ensuring that once drilled, the pens will fit comfortably without touching and that the design looks balanced. It’s a small step that makes a big difference in the final appearance of your modern wall decor.
Step 3: Precision Drilling
Now, it’s time to drill each hole. Aim for a depth of approximately 3″ to 4″. The most critical aspect of this step is to maintain the drill as perfectly vertical as possible. If you have access to a drill press, this is the ideal tool for achieving consistently straight holes. However, if you’re using a hand drill, a steady hand and a keen eye are essential. It’s incredibly helpful if one person can guide and check the angle while another operates the drill, ensuring that each hole is drilled straight down. This prevents pens from leaning awkwardly and contributes significantly to the clean, modern aesthetic of your wall-mounted organizer. Always wear appropriate safety glasses when drilling.
Step 4: Sanding for a Smooth Finish
Once all the holes are drilled, give the entire wood block a thorough sanding. Start with a coarser grit sandpaper (e.g., 80 or 120) to smooth out any rough edges or splinters around the drilled holes and on the surfaces of the wood. Gradually move to a finer grit (e.g., 220) to achieve a beautifully smooth and refined finish. This not only makes the piece pleasant to touch but also prepares the surface perfectly for any painting or staining you plan to do, ensuring a professional-looking result for your DIY wall organizer.
Step 5: Embrace Creativity and Overcome Challenges: Decorate Your Pen Holder
With the structural work complete, the true fun begins – decorating your unique pen holder! This is where your personality can shine through. However, I want to take a moment to address a common, yet often unacknowledged, aspect of DIY: the “failed attempt.” There’s a persistent myth in the DIY world, fueled by perfectly curated “before and after” photos, that talented creators effortlessly produce flawless results every single time. If you’ve ever felt discouraged when your DIY efforts don’t go according to plan, please know that you are not alone, and it’s a completely normal part of the creative process!
From my extensive DIY experience, I can confidently say that at least 99% of my projects encounter unexpected challenges, mistakes, or outright “failures” before reaching their final, successful form. This wall-hanging pen holder was no exception! Initially, I envisioned a sophisticated gold, white, and natural wood stripe design. It sounded elegant on paper, and I even captured a neat process photo. Yet, upon completion, the reality was far from my imagination. The gold paint blended almost seamlessly with the cedar wood’s natural tone, making it practically invisible. I was left with awkward white stripes that completely missed the mark!
But fear not! I’m well-accustomed to DIY setbacks and actually find a strange thrill in them. They’re opportunities for innovation! So, I happily sanded it all down and started fresh. Embracing the spirit of mid-century modern design, I opted for a bold, geometric pattern. I began by cutting a piece of paper to the exact size of the wood face, then folded and colored a triangle pattern to visualize the design. Feeling inspired, I crafted sturdy stencils from discarded chocolate boxes – a task made even more enjoyable with the help of chocolate (a secret weapon against creative blocks!). I then carefully painted in the triangle motifs, using light pencil guidelines drawn on the wood as my guide.
The subtle remnants of the sanded white and gold from my first attempt peeked through slightly, lending a charming “chippy” character to the new design. See? Even perceived failures can contribute to a happy and unique outcome! To add another layer of visual interest and to refine the interior wood surface, I also painted the inside of each drilled hole white. This unexpected design element provides a playful contrast and a smoother finish, making your pen holder truly one-of-a-kind. Don’t hesitate to experiment with colors, patterns, or even wood stains to make this wall-mounted organizer uniquely yours.
Step 6: Final Assembly and Wall Mounting
The final steps involve preparing your pen holder for its new home on the wall. Carefully attach the sawtooth hanger to the back of the wood block, centered at the top, using the tiny nails provided with the hanger. Ensure it’s securely fastened to bear the weight of your pens. Next, glue a couple of felt pads to the bottom back corners of the wood. These small additions serve a dual purpose: they protect your wall from scratches and help the pen holder hang perfectly flush, preventing any wobbling. And just like that, you have completed your very own bespoke, modern wall-hanging pen holder – a proud testament to your creativity and a stylish solution to desk clutter!
Discover More Creative DIY Projects for Your Home
If you’ve enjoyed crafting this wall organizer and love the idea of transforming everyday materials into home treasures, you’ll be excited to explore more projects from A Piece Of Rainbow. We believe in sustainable crafting and unique home decor solutions.
Do you appreciate the rustic charm and versatility of reclaimed wood? Then you’ll adore these charming storage crates made with pallet wood. Inspired by vintage orchard and farm crates, they feature an easy wax paper image transfer method, perfect for adding personalized flair to your storage solutions.
For a piece of unique wall decor that truly captivates, explore our birch forest shadow box. Amazingly, this intricate and serene artwork is crafted using just two pieces of paper, demonstrating the power of simple materials to create stunning visual effects.
How about adding a touch of natural beauty to your walls with some super simple wall hanging bud vases? These elegant little holders are perfect for displaying cherished treasures you find on a leisurely walk, bringing the outdoors seamlessly into your living space.
And for those special occasions or holidays, why not illuminate your home with some magical dimensional paper lanterns? Complete with a free template, these enchanting creations are surprisingly easy to make and add a festive glow to any celebration or everyday decor.
——————————————
Explore More Modern Geometric Home Decor Ideas
Looking to infuse your home with contemporary flair and clean lines? Dive into more inspiring geometric designs and innovative decor solutions curated by Remodelaholic:
Discover Trendy Geometric Home Decor Ideas
Build a Stylish Cube Plant Stand with Fretwork
Craft Your Own Triangle Modular Concrete Wall-Hanging Planters
Browse 100+ Interior Painting Ideas to Refresh Your Home