
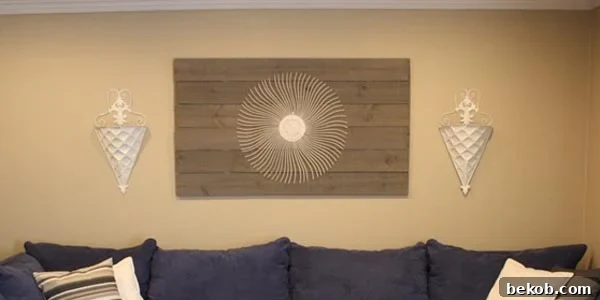
DIY Wood and Wall Art: A Step-by-Step Guide to Rustic Home Decor
Looking to add a touch of rustic charm to your home? This DIY wood and wall art project is the perfect solution. Originally contributed by Cul-de-Sac Chic, this guide provides a simple, step-by-step approach to creating a unique piece of art that will enhance any room. Whether you’re a seasoned DIY enthusiast or a beginner, this project is accessible and rewarding. This guide focuses on creating a piece inspired by coastal themes, distressed wood, and a personalized touch.
I created this wall art piece over the summer, but just never got around to posting it. My initial plan was to complete a few more elements in our family room before sharing, but sometimes you just need to share the progress! This project was inspired by Layla from The Lettered Cottage’s flag art. The idea of incorporating a sunburst design onto a backdrop of picket fence boards immediately appealed to me. I especially liked the painting technique she used, which gave the wood a perfectly aged and weathered look.
Here’s a breakdown of how I brought this vision to life.
Materials You’ll Need:
- Picket fence boards (6 recommended, but adjust based on desired size)
- Miter saw
- Gray paint
- Paintbrush
- Water
- Scrap wood strips
- Screws or nails
- Picture hanging kit
- Sunburst decoration (optional)
- Sconces (optional)
Step-by-Step Instructions:
1. Cutting the Picket Fence Boards:
This was my first experience using a miter saw, and I found it surprisingly easy to operate. Begin by determining the desired length for your picket fence boards. Once you have the measurement, mark a line on each board where you need to make the cut. These pickets cost around a dollar each.

To use the miter saw, hold down the trigger and gently pull the saw down to make the cut.

Position the board securely on the saw base.

Before engaging the trigger, lower the blade to ensure it’s aligned with your marked line. Once you’re confident in the alignment, engage the trigger and complete the cut.

2. Achieving the Distressed Wood Finish:
The key to the rustic look is Layla’s painting technique. Dip your paintbrush into the gray paint, then dip it into a container of water and swish it around. This thins the paint, allowing the wood grain to show through and creating a beautifully distressed effect.

3. Assembling the Boards:
We used scrap wood strips leftover from previous projects to attach the painted boards together. Secure the strips to the back of the picket fence boards using screws or nails.

4. Finishing Touches and Hanging:
Once the boards are securely assembled, we used a picture hanging kit to mount the artwork on the wall.
The possibilities are endless! You can also add a sunburst decoration to the center of the wood panel for added dimension. The sunburst can be store-bought or handmade, allowing for further personalization.
5. Optional: Adding Sconces
I found these sconces at Marshalls and gave them a fresh coat of white spray paint. While I’m not entirely convinced they’re the perfect fit, I felt the wall needed something more than just the artwork. My ideal vision is a big, chunky wooden hurricane sconce, but I haven’t yet found one that aligns with my budget and personal taste. It might be time to try and create the sconces I have pictured in my head! This project allows you to explore other decorating options and add elements that express your personality.
More Ideas for Wood and Wall Art
Beyond this picket fence project, the world of wood and wall art is vast and varied. Consider exploring these additional ideas:
- Pallet Wood Art: Reclaimed pallet wood is a fantastic resource for creating rustic signs, wall hangings, and even furniture.
- Geometric Wood Art: Combine different shapes and colors of wood to create modern and abstract geometric art pieces.
- Wood Slice Art: Use wood slices as canvases for painting, pyrography (wood burning), or decoupage.
- String Art on Wood: Create intricate designs by hammering nails into a wood surface and then weaving string between them.
- Mixed Media Wood Art: Combine wood with other materials like metal, fabric, or glass for unique and textured wall art.
Tips for Success:
- Safety First: Always wear safety glasses when using power tools like a miter saw.
- Measure Twice, Cut Once: Accurate measurements are crucial for a clean and professional-looking finished product.
- Experiment with Finishes: Don’t be afraid to try different paints, stains, and techniques to achieve the desired look.
- Embrace Imperfection: Rustic art is all about character and charm, so don’t worry too much about minor imperfections.
- Personalize Your Art: Add your own unique touches to make the artwork truly your own.
Conclusion:
Creating your own wood and wall art is a fun and rewarding way to add personality and style to your home. This simple picket fence project is a great starting point, and with a little creativity, you can adapt it to suit your own taste and décor. So gather your materials, unleash your inner artist, and transform your walls into works of art!
Remember to check out Layla’s technique for more inspiration on achieving that perfect distressed wood look.