Read the sequence from the top before cutting, painting, or moving pieces.
Living Room Update 5: Built-in Bookcases… By Bekob If you wanna read about our current project open this Part 1, Part 2, Part 3, Part 4, Rugs, Corner Bookshelves Plans and Sofas.Sorry about missing the living room post last week. I am getting the hang of this two child thing… sorta, tired yes, but at least for the next week or two I have an infant that sleeps all day so it isn’t too much harder. YET…, thank heaven for easing into the transition.
Anyway, so I left you hanging a bit about my sudden design change and request for some built-in bookcase,s in our living room. I told you how the space is a walk through to get to the kitchen and because of this traffic pattern, it naturally separates the room into two areas. Which means, we had to figure out a way to fix this a bit.
I should explain, this space is not our “family” room. Yes, we have a box of toys and plenty of board books to read, but this space is not our room to really entertain or hang out, that space is upstairs. We don’t actually have a T.V. in this room at all either (although I am considering a small portable version for desperate moments)… we don’t watch T.V. on a regular basis, I just don’t have time (exception to rule: Biggest Loser, but sometimes we catch up on this one online too!). If I need a distraction (think making dinner) for the little meisje, I bring in the portable player so that I can get things done while Etta stays busy dancing to the Barbie movies… This means that we are setting the room up for conversation, not around a TV screen.
On with the plans then, we have two awkward corners in our living room, as shown below with the large arrows, the long lines are the basic traffic patterns for the space.
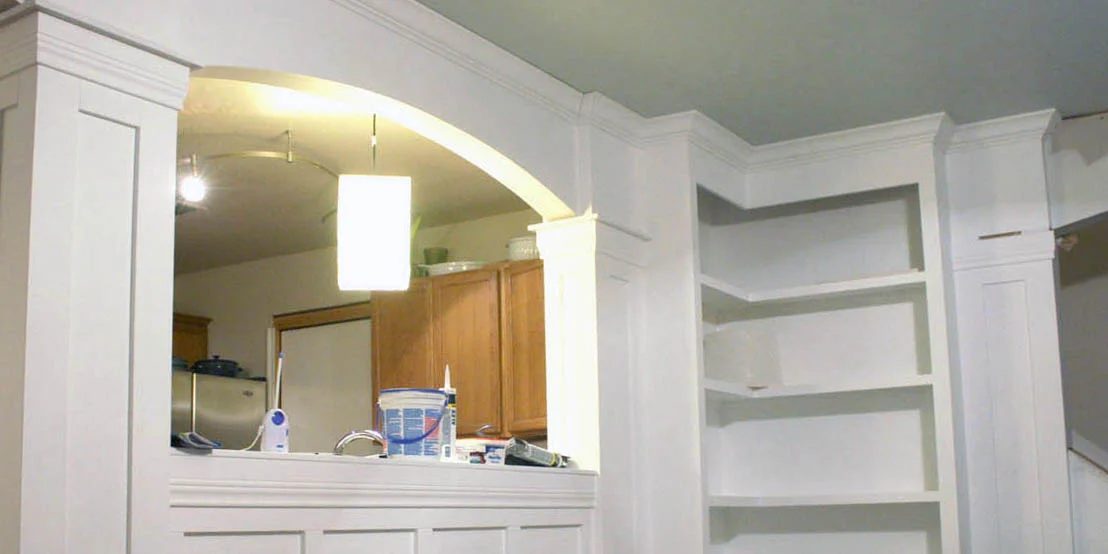
The diagonal corner makes no sense, I think there must be plumbing running through that space, cuz there is no other reason for it to be diagonal like that. Ugh! The opposite corner by the stairs is cut off from the other space because of the way we have to pass through the room. There is hardly a way to use the space. A small sitting ares is about all, and I have tried this in the past with no success. The problem is the space is too small that it just doesn’t fit well, even with a single chair. I started drawing up options for the built in for the corner by the stairs first as a solution to the space planning issues. Below is what the space would look like with the columns finished, (they were installed but not trimmed out yet.) So I drew the moldings in and the copied the image a few times to draw on it: Here are the two options I was debating on: A 2/3 height built in, would allow for a T.V. on top if ever wanted. Would fill the space nicely and give you some pretty storage. OR Full height, uses up the whole space and adds a ton of storage space. I admit, I liked both options, but I loved the full height option, especially since it brings your eye up and we only have 8 foot tall ceilings in this space and could use the illusion of height. At this point, I also thought, “Well, since we are adding that corner bookshelf, maybe we can cover up the other strange little diagonal corner on the other side of the room and make it look intentional.” Here is the back wall you might notice the diagonal wall section pointed out: The space is not quite centered, we had to fudge a little to make it appear equal. I added the look of the upgraded door casings that we were planning on too. This option includes a window seat, which I will admit we haven’t built yet, and technically I am still debating on adding it at all. I think I am pretty sure we will do it at some point though… I think… Do you want to see how it all came together? I guess I will show you anyway… (Sorry in advance for all the semi-awful pictures, depending on the time of day and lighting the pictures are either okay or awful, and very few are true to color, but you’ll get the option, right?) I will start with the window wall, and take you through that part first. In order to save some time and money we decided to make it fixed shelving just FYI. If you have other questions let me know in the comments, otherwise you can just see how the room came together through pictures. Here is the back wall before starting on the shelves.Now we needed to add some crown molding. We painted it all with several cots BEFORE cutting and nailing. I also painted the edges of the ceiling where the crown would be installed. Then we had very little touch up painting to do and no hard edges to paint… This is good advice (even if I do say so myself), we have done it in every house we’ve owned, it saves a lot of sore muscles and kinked necks I promise!
Here is the before, no paint or moldings:You can see the ceiling color ends in the middle of the room. (this is the same color we used in our Asheville house ceilings and I LOVE it I will have to find the name….sorry)
Here is the full height corner bookcase without moldings… Installing the moldings…Partially done moldings… there is a whole ‘nother layer of moldings we added below these to make the crown appear larger like we did in our first house 9 years ago. But it is almost 11:00 an I NEED to sleep.
Okay, until next week… What do you think of the built-in bookcases? How do you like the moldings? the columns and wainscoting? I’d love to hear what you think!